Thursday, March 23, 2017

Rebuilding an HO Scale Bachmann U36B pancake motor

Rebuilding an HO Scale Bachmann U36B pancake motor

Part 1

another total rebuild of a pancake motor


Here are the first 2 parts of a short series of rebuilding a pancake motor from an old Bachmann U36B.  I like doing these because they are good practice for building the skills you need for more complex rebuilds.  You can really dig into these projects without fear of ruining a $300 locomotive...


Friday, March 17, 2017

Repairing Cracked Gears with Baking Soda and Super Glue

Repairing Cracked Gears with Baking Soda and Super Glue

HO Scale Bachmann Old School Pancake Motor Repair


I've been advocating gear replacement a lot lately.  That is the preferred method, but sometimes you just need to repair and existing gear.

You may have heard the legend of the baking soda and super glue repair method.  If you haven't, then it goes like this:  you can combine baking soda and super glue into a paste that can be used to repair gears that are impossible to find a replacement for....

That is mostly correct, but how you actually do it is to fill the crack with a fine dusting of baking soda and apply a tiny drop of super glue and it will create a super strong weld.

While rebuilding another pancake motor from a Bachmann U36B, I did discover 2 cracked gear and decided that it was time that someone demonstrated the legend.....

Here is a video demonstrating:


Tuesday, March 7, 2017

Rebuilding old Bachmann HO scale U36B Part 8 finishing the handrails video

Rebuilding old Bachmann HO scale U36B Part 8 finishing the handrails video

handrails installed

Finally we got the the handrails installed and some white safety stripes painted here and there.  This build is now operational, anything else we do from here is just an improvement.

Check out the final handrail video in this series:


Saturday, March 4, 2017

Rebuilding old Bachmann HO scale U36B Part 7 the handrail videos

Rebuilding old Bachmann U36B Part 7 the handrail videos

making HO Scale handrails from scratch out of brass....the videos


I've made a video that is so long, that I'm already on part 4 and over and hour and still not done uploading it all.

But while you're waiting here are the first 4 parts....

Part 1 The Introduction for only the newest of n00bs

Part 2  Stanchions

Part 3 Endrails
Part 4 First Solder and Shape

We'll finish up in the part 8 with the final videos.....

Thursday, March 2, 2017

Rebuilding old Bachmann U36B Part 6 Brass Handrails

Rebuilding old Bachmann U36B Part 6 Brass Handrails

making new handrails from brass wire


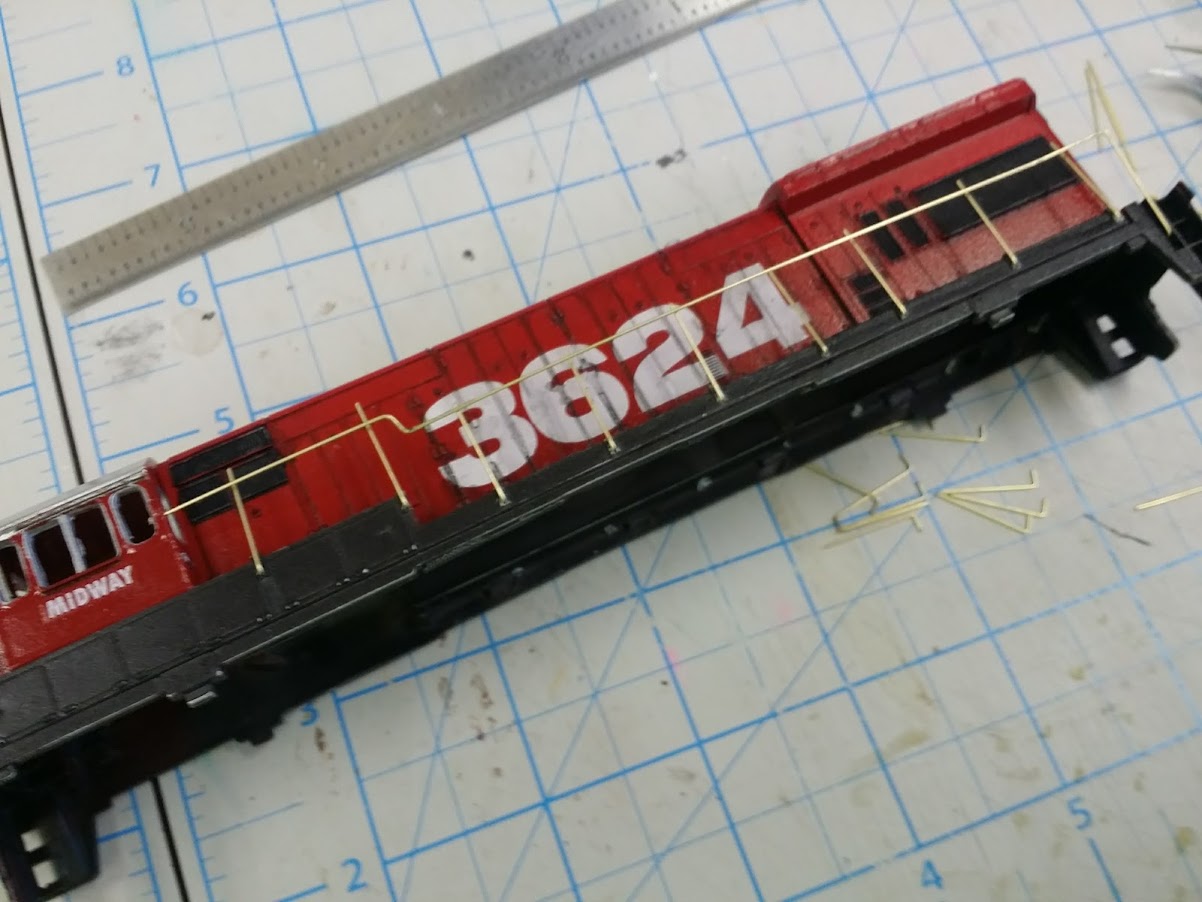
We're at the point where we need some handrails for our U36B project and they way we're going to do this is with brass wire and solder.  We'll be using K&S wire #8159 .020in from Hobby Lobby at $1.49.  4 Pieces will be just enough to do this without wasting the wire.

In the old days, I used to do this out of piano wire which is even cheaper, but much harder to bend.  I don't know how I ever had the patience to bend that stuff, but it can be done.  Piano wire is pretty tough to solder also.

We aren't going to do a lot of measuring to make these handrails.  Remember that our goal here is to finish a model good enough to go on the "C" list.

The A list is all your rock star scratchbuilt super detailed contest winning most excellent pieces.  The B list is your customized factory super detailed $300 locomotives that you don't feel comfortable about throwing into a tub of pine oil.

Then there is the C list.  These are your supporting cast members, the extras, that 3rd or 4th locomotive in the consist during a photo shoot.  It's one of the workhorses in an operating session.

Being a workhorse means having handrails that are more durable than the latest slippery plastic scale handrails. Those handrails don't take a lot of abuse and seem to always be wavy somewhere...

First let's measure up a bit, here's a pic of a prototype that will guide us in the employment of our Mark I eyeball....
This photo shows us that the handrail should cross by the rear grill and the top of the rail in front should be lined up nicely with the words on the front.  Using the ruler, that means a rough hieght of .5 inches above the deck, but we're still going to do this be eyeball and stay away from the ruler as much as we can.

Once we make a rail, then we can line it up on the cutting board and copy it using the ruler lines on the board which is much easier.

First we need to drill some holes for the stanchions.  I'm going to use a drill bit that by eyeball looks real close to the size.  I could have gone to the Hobby Store and got a matching drill and wire set, but we should really try to use what we have on hand.  The dental pick is used to make a mark where to drill.  That's really important to prevent the drillbit from breaking.  I could have also used the drill press or dremel, but the pin vise is almost as fast with no danger of melting like a dremel.
Now we need to drill 28 holes and check to see that the wire fits....it does: 
Using the prototype picture and an alcohol marker and steel ruler ($4 on ebay) I determined the .75 inch stanchions were more that long enough.  We need them to be just a bit long so we can shape them later. 
 Now the stanchions are cut, so lets bend a foot on 20 of them, leaving 4 vertical stanchions for each end.  The end stanchions go straight into the anti climber from the top.
When all are bent it should look like this: 
 Now we take a long section and bend the back end first.  Put the foot on it and then make a mark where to bend it for the long section.  Make the bend and check to see if it's good.  It probably will be off a bit so unbend it and do it again.  You'll get it and then you can make a mark where that short bend goes near the cab.  It may take a couple tries, but once you have it, you can trim it and then we'll get ready to copy it.
 Here's just a check look to see if what we've done is roughly what we had intended...
 Next, we aren't really repeating the process for the other side, we're copy the bends on the cutting board using the blue lines then checking them on the shell.  Way easier than doing another totally from scratch again.
 Starting to look pretty good...
 Same technique in the front.  You can make as many fancy bends as you want here, right now I'm just doing the basic bend.  Once ready, we copy it for the other side.
 The front looks pretty decent, we can copy it on the cutting board for the rear.  At this point you should be getting pretty good at marking spots to bend and making a good bend.  If it's wrong, you straighten it and do it again.  It's ok if the wire gets beat up without breaking, it actually gives it a bit of character.
 The parts are made and now we can move to the soldering bench...


Tuesday, February 28, 2017

Rebuilding old Bachmann U36B Part 5 Weathering

Rebuilding old Bachmann U36B Part 5 Weathering

1 color panel line pin washing


If you haven't figured out by now, my trains are inspired by the Minnesota Commercial Railroad, so my weathering is based on photos I took of the real deal....

The effect I'm going for in this build is sort of like this B30-7 I found in St. Paul...

my gallery of Minnesota Commercial can be found here:


Here is where we are with our build:


I used Testor's Gloss black and mineral spirits to just dab at the panel lines and let the paint flow where it will.  Then I used either my finger, a cutetip or a paper towel to wipe off the excess.

I'd say for this low detail build we are looking pretty good and can now go ahead and spray a gloss sealer on it.  Then we can move on to the handrails.

For a detailed look at how the real pros do this, here is my favorite panel line pin wash video:


This guy knows how to do it.  He uses a pretty expensive pin wash, where I use just plain Testor's.

Rebuilding old Bachmann U36B Part 4 Decals

Rebuilding old Bachmann U36B Part 4 Decals

Modern Decals for the Vision Impaired Modeler


Each month I participate in an operating group that really gets quite sophisticated.  Not having the best vision is a problem.  So you wear glasses on your nose or bifocals.  Comparing your switch list to cars on the track at around 3 feet away gets to be a problem.  Better yet is when you think your car is in the middle of a train that's in the middle of a yard and you want to look between cars to spot a number.

Years ago I decided I wanted to do the opposite of what most railroads do.  I'd have a big number and a small logo.  The problem was making decals for big numbers.  And the most pressing problem, making them white.

I used to do a lot of commercial photo printing and have 2 large format high resolution photo printers.  I was convinced that I could learn to print the best decals that could be made.  You can go back to June 2016 to read my series on making decals.  Since then, I've gotten my ALPS MD-1000 working great for white decals.

No printed decals can match the strength of white decal paper.  They just can't, so when it comes to large white decals the best way to go is the Cricut.  My Cricut Explore is what I use to make exactly the numbers that I want when I want them.  I don't need to assemble my numbers from a sheet of general numbers.  I just cut them.


Once they're cut I can apply them.  What I use is 1 drop ammonia and then a jar cap about 2 inches across and half inch deep.

Large decals can be hard to work with.  A Cricut spatula works for the big decals and I use an xacto 17 flat blade for small decals.  Use quite a bit of water and place the decals.

Position them all...plenty of water, if you screw up, put it back in the water...

Now let them dry out pretty good BEFORE you use Solvaset.


Now a little solvaset at a time, big decals tend to wrinkle up, so little by little...


While we're waiting, let's do some number boards in Freehand....

30 years ago, I painted the number board position white, cut individual numbers, 4 sets of them, and placed them on the white and then put a clear decal with black border over the top.  Yes, they looked good and still do, but that's too much work considering I can do this:
 I used my machinist's ruler to measure the number boards then typed the data into Freehand.  A sheet of Epson Premium Glossy photo paper and I get this:
These numbers will look awesome for something like 300 years according to Epson...

White glue is the appropriate glue to attach photo paper to plastic.  It will dry clear which renders mistakes invisible.


Now that looks pretty good if you ask me.