Tuesday, October 11, 2016

The Ghosts of Oelwein Part 5

The Ghosts of Oelwein Part 5

Remnants


So what's left....in April 2016 here are some of the sad sights...


That's what's left of the main shop, paint shop, and everything between the freight shop and the museum.  In 2005 some developers along with the usual government employees claimed there was the perception of contamination and that's why this place is the way it is now.

The bridges leading into the shops a few years ago....


And now.....


that's what remains.

The Ghosts of Oelwein Part 4

The Ghosts of Oelwein Part 4

Evidence of the Existence of a Railroad


Gone now and very sad it is to see the site of the once mighty shops.  It feels like all the work that was ever done at this one place has been erased.  What remains will not mean anything to the future.  This is a last testament to what went before...  should power go off, then this too will disappear.

In the original plans, this was the freight car shop...


The above section is part of the old coach shop, which is had a second floor where they did upholstery and had 5 tracks coming in from the transfer table.

The unloading platform of the freight shop is a worn out place....

from the other end...


from above, a few years before...


The Ghosts of Oelwein Part 3

The Ghosts of Oelwein Part 3

The Run Through Maintenance Shop

Back in the day, CNW upgraded Oelwein to be capable of servicing 6 locomotives on 2 tracks in a block building on the east end of the shop... locomotives could be run in one side and out the other...

Here's a former Conrail SD45 next to the run through shop in 1991...

This is one of the rebuilt SD45's that came from Oelwein and was stored at the Harrison Street Shops at East Minneapolis Junction in 1994...


some former Conrail U30C that never got rebuilt, but were stored at Oelwein...


Here's the shop, it's that unpainted concrete block building... where the tracks enter at the top of the picture is right next to where the old Liberty Club was located.  It was a lavatory, locker room, meeting hall and reading room for the workers at the shops.


Where that rectangular hole is in the picture is where the old power house was located.  It had it's own deep water well and a large smoke stack...

Nothing but a pile of sand now.


The Ghosts of Oelwein Part 2

The Ghosts of Oelwein Part 2


The shops are gone now, but let's take a closer look at a couple features of this place....

Back in 1989 I saw Chicago & NorthWestern FP7 217 in the deadline outside the shops at Oelwein...


Not too long after, it was restored as Chicago Great Western 116A and kept at the museum.  I'm going to skip straight ahead to April 2016....


Up close, it's starting to look a little rough and about time for a new restoration...

Also in 1989 I found Chicago & NorthWestern SW1 616 (formerly Chicago St. Paul Milwaukee & Omaha CStPM&O or CMO 55)


It's still in need of a restoration in April 2016....


Here's the Old CGW Roundhouse which is still in use as of April 2016, although there hasn't been a turntable in a very long time.....


Moving on....


The Ghosts of Oelwein Part 1

The Ghosts of Oelwein Part 1

I've been meaning to get around to doing something about the old Chicago Great Western (CGW) and later Chicago & NorthWestern heavy repair shops in Oelwein Iowa.  The shops are gone now.  But let's take a look at how it was....

First, here is a link to some interesting info about the construction of the shops:

http://ir.uiowa.edu/cgi/viewcontent.cgi?article=6327&context=annals-of-iowa

The part that interests me is where a transfer table was described as being part of the original design.  The table itself was long gone the first time I ever got a look at the place back the late 1980's.  That would have been something to see though.  When I look at the aerial photos, the outline is of the transfer table pit is easy to spot.  It also fills in the void where something doesn't look quite right about the track arrangement.  There's 1000 feet of shop there, but half has no tracks leading to the doors.  That's where the table came into play.

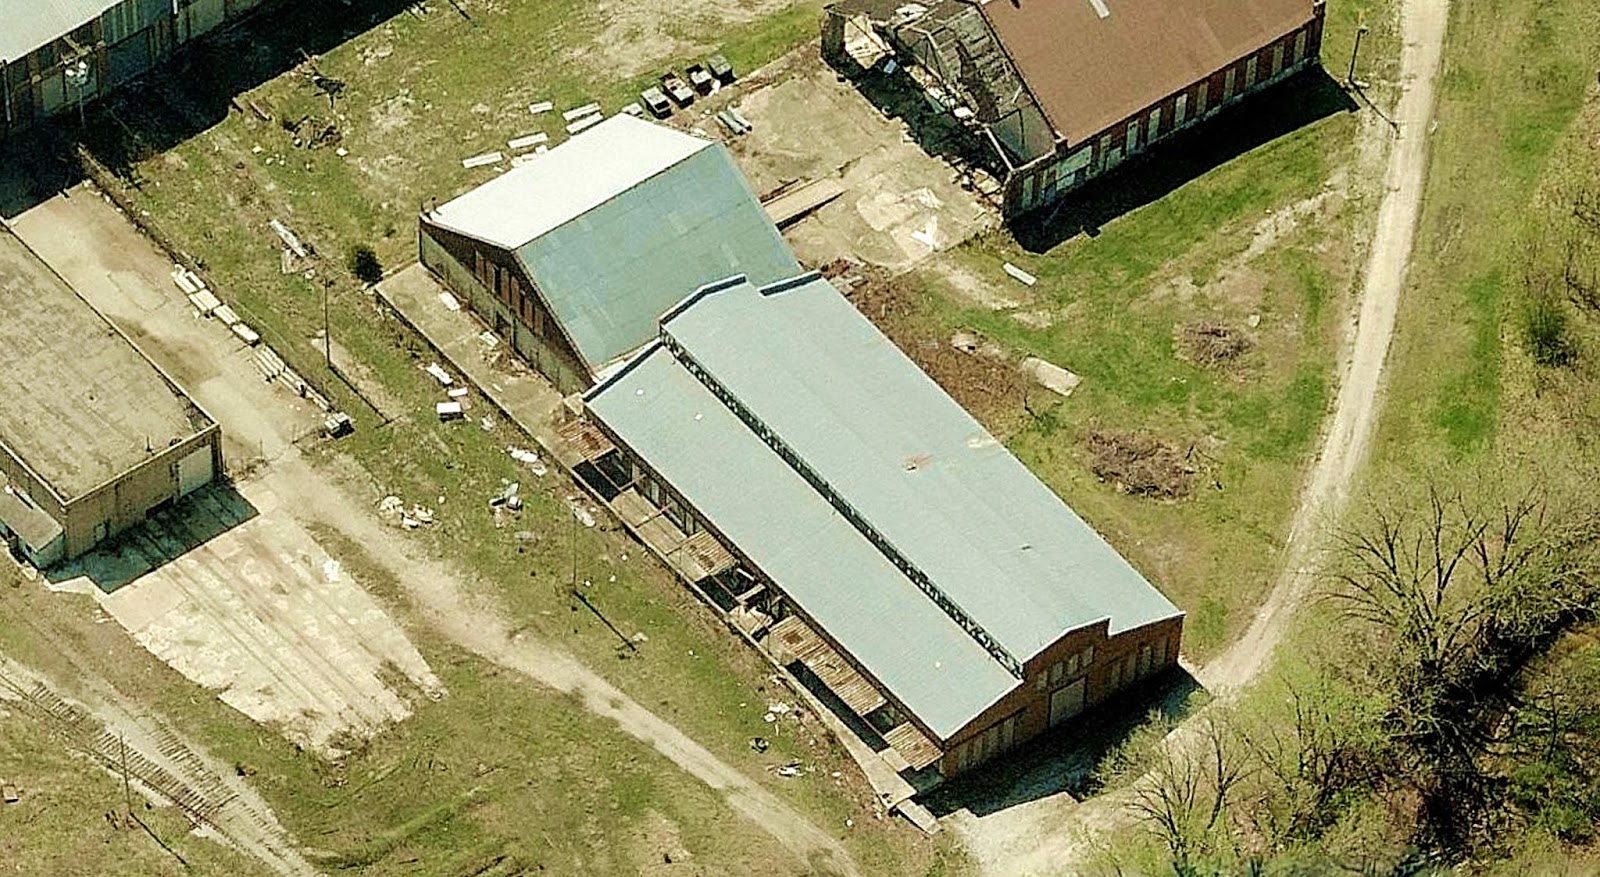
Let's take a look at some photos from Bing Maps Bird's Eye View.... here's the remainder of the Oelwein Shops shortly before they were torn down...


You can see the tracks coming in over the drainage ditch.  The picture is extra large, so go ahead and take a closer look.


When you take a closer look you can see where the transfer table used to be.

Next up, let's look at a couple old historical photos and a post card....


So that's how it was...


Friday, September 2, 2016

Janus Hammerhead Heavy Duty 61' Bulkhead flatcars

Janus Hammerhead Heavy Duty 61' Bulkhead flatcars


These heavy duty bulkheads were made to be run empty.  They don't have details, but they do have unique numbers.  At about 73' (HO scale) they push the limits of 22" radius track.  They are nice and heavy and run pretty smooth.  With some skill, a set of 10 or more can be pushed in reverse around 22" radius track very carefully, but like I said, with some skill and practice.


Setting proper coupler height is extremely important on long cars like these.  If you've ever worked with the 85' and 86' flats and box cars, you probably have some idea.

When the coupler height is just right then everything works, when it's off a bit then cars get stranded where the grade changes.  If the height is correct, then it's a sure sign that an easement is needed at that spot in the track.

On totally level track, these flat cars work very well in reverse.  They also perform best when using the uncoupling magnet rather than a pick.

On my test track there is a downgrade where it's readily apparent that the heavy weight is pushing the locomotive with some force.


Saturday, July 2, 2016

Making Inkjet Waterslide Decals Part 6

Making Inkjet Waterslide Decals Part 6


The next step in this process was to try Walthers Solvaset.  But first let me recap the process so far:

1.  Design the decals in Adobe Illustrator
2.  Print them on clear decal paper I got from ebay using an Epson Stylus 2200 with settings of:
  max quality, glossy photo paper, hi-speed off, edge smoothing on
3.  Light coat of Krylon Colormaster Clear Flat Acrylic
4.  Microscale Liquid Decal Film hand brushed on after the acrylic is dry
5. Cut, soak, apply....

Now we come to the Solvaset.

Microsol is good, but not quite as strong as Solvaset.  I needed something to deal with the fact that I sprayed acrylic on my decals in order to allow me to apply decal film.

The Solvaset is stronger, but it will wrinkle the crap out of your decals if you aren't paying attention.  I like to get a little Solvaset under the decal and then wait a bit before going over the top to avoid the extreme wrinkling.  But, that still doesn't quite make them totally deal with the look of the film.

There is another old school method that I haven't experimented with yet, and that's gloss coating the model then putting on the decals and then glossing and finally finishing.  That's the way I used to do it, but the problem is that it doesn't let me know how well my printing method is doing.  So until I get the printing perfect I won't try the gloss undercoating.

Once I get the perfect decal, we'll move on to the next step and that is finding the best after coating.  So far, Krylon has been having a great deal of difficulty completely curing under indoor conditions.  However, a couple model that sat by an open window did cure nicely.

The white ink and the gloss coat for the Alps MD-1000 has just arrived and there will be an update on printing the yellow and white decals on clear paper shortly...if you remember, I can't use the highest settings on the Alps without having the finish coating cartridge, but now that I have it we'll give it a try.