Thursday, December 22, 2016

Scale Test Car

Scale Test Car


I've got a model of a scale test car that I haven't got around to building yet.  They are kind of interesting, but since there aren't as many good pictures of one as you might think, I'll post some of mine here.

I got these at the Minnesota State Scale in St. Paul in November of 2016.


Note that the build date is 1936.  Also note the round sockets on the ends.  You know what those are for? They're for moving the car using a pole held by a brakeman between the car and a locomotive or truck from another track.  How'd you like that job?

Tuesday, October 25, 2016

Matchbox No. 29 Fire Pumper Restoration

Matchbox No. 29 Fire Pumper Restoration


Restoring and Rebuilding Matchbox Die Cast Cars


I've got a tub full of Matchbox, Hot Wheels and other die cast cars that I've always thought I'd like to rebuild and do some detailing and use them with my trains.  Generally, most of them aren't quite the right scale and lack details that you would find in any modern scale vehicles.

The one advantage they have is that they are really cheap.  I also have a personal affinity for the regular wheel Lesney cars of the late 1960's.  These were the toys that I first played with when I was a kid.  I always felt that the older Matchbox cars were better.  There was a point when Matchbox started making too many fantasy cars which was mainly the domain of Hot Wheels.

I still have all my originals safely in their cases, but I've accumulated a lot of the old 1-75 series that are in pretty poor shape.

Contrary to popular belief, they aren't valuable.  In general, the cost of these cars is between $1-$5.  Every year I seem to pick up about 10 or so more that are wired to various flat cars I buy at train shows.

First I need to plug an awesome video that got me excited about doing a much better job at these restorations:

YouTube Channel:
Angelo Bonsignore

Specifically this video:  

How to restore Diecast Cars from Nov 24, 2012


Here's the link:


This guy is really good at this and I hope he does some videos on this subject.  This video convinced me to get the Vibratory Tumbler from Harbor Freight.  Here's the link to that tool:


I plan to do this on my YouTube channel later, but I wanted to give you a taste of what can be done:

I had 3 each Matchbox No. 29 Fire Pumper Truck and this is how they looked when I decided they were going to be the models selected for this rebuild:


Pretty rough shape.  Notice they all have the Denver decal and 2 of them are missing the beacon.  None of them had the ladder.  Once I opened them up I was surprised to find the beacon was broken, but it was still on the inside.

I washed, stripped and polished them by hand.  In Angelo's video he uses the tumbler to get a much nicer finish than I got.  Then I used Rustoleum Sunburst Red, which I tend to use a lot to paint them.  I don't care for the 2x paints because they're a bit thick.  I also use a lot of the Rustoleum black, gray and white primers. For rust or brown primer I prefer Krylon.

This red is one of the few colors that can be baked or heated with the heat gun.  Here's an intermediate shot:


You can see that my metal wasn't as polished as it would have been if I used the tumbler, but that will happen on the next set of rebuilds.

The plastic hoses and the windshields were washed with dish soap and then I polished the windshields with a head light restoration kit.

I used 3M blue tape to hold the beacons and windows in place and I didn't use rivets to replace the bases.  I'll probably just do a drop of white glue there.  The nice thing about die cast vehicles is that you can do them over if you suddenly get much better at it like I did.

I wanted to have unique engine number instead of making a new Denver decal, so I went ahead and gave them some yellow numbers.  And here they are:


They turned out pretty nice and will look great at a fire station that I'll make some day.

Tuesday, October 11, 2016

The Ghosts of Oelwein Part 5

The Ghosts of Oelwein Part 5

Remnants


So what's left....in April 2016 here are some of the sad sights...


That's what's left of the main shop, paint shop, and everything between the freight shop and the museum.  In 2005 some developers along with the usual government employees claimed there was the perception of contamination and that's why this place is the way it is now.

The bridges leading into the shops a few years ago....


And now.....


that's what remains.

The Ghosts of Oelwein Part 4

The Ghosts of Oelwein Part 4

Evidence of the Existence of a Railroad


Gone now and very sad it is to see the site of the once mighty shops.  It feels like all the work that was ever done at this one place has been erased.  What remains will not mean anything to the future.  This is a last testament to what went before...  should power go off, then this too will disappear.

In the original plans, this was the freight car shop...


The above section is part of the old coach shop, which is had a second floor where they did upholstery and had 5 tracks coming in from the transfer table.

The unloading platform of the freight shop is a worn out place....

from the other end...


from above, a few years before...


The Ghosts of Oelwein Part 3

The Ghosts of Oelwein Part 3

The Run Through Maintenance Shop

Back in the day, CNW upgraded Oelwein to be capable of servicing 6 locomotives on 2 tracks in a block building on the east end of the shop... locomotives could be run in one side and out the other...

Here's a former Conrail SD45 next to the run through shop in 1991...

This is one of the rebuilt SD45's that came from Oelwein and was stored at the Harrison Street Shops at East Minneapolis Junction in 1994...


some former Conrail U30C that never got rebuilt, but were stored at Oelwein...


Here's the shop, it's that unpainted concrete block building... where the tracks enter at the top of the picture is right next to where the old Liberty Club was located.  It was a lavatory, locker room, meeting hall and reading room for the workers at the shops.


Where that rectangular hole is in the picture is where the old power house was located.  It had it's own deep water well and a large smoke stack...

Nothing but a pile of sand now.


The Ghosts of Oelwein Part 2

The Ghosts of Oelwein Part 2


The shops are gone now, but let's take a closer look at a couple features of this place....

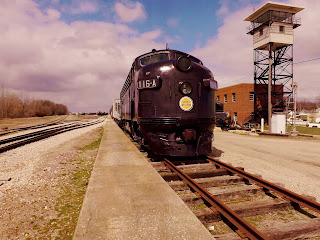
Back in 1989 I saw Chicago & NorthWestern FP7 217 in the deadline outside the shops at Oelwein...


Not too long after, it was restored as Chicago Great Western 116A and kept at the museum.  I'm going to skip straight ahead to April 2016....


Up close, it's starting to look a little rough and about time for a new restoration...

Also in 1989 I found Chicago & NorthWestern SW1 616 (formerly Chicago St. Paul Milwaukee & Omaha CStPM&O or CMO 55)


It's still in need of a restoration in April 2016....


Here's the Old CGW Roundhouse which is still in use as of April 2016, although there hasn't been a turntable in a very long time.....


Moving on....


The Ghosts of Oelwein Part 1

The Ghosts of Oelwein Part 1

I've been meaning to get around to doing something about the old Chicago Great Western (CGW) and later Chicago & NorthWestern heavy repair shops in Oelwein Iowa.  The shops are gone now.  But let's take a look at how it was....

First, here is a link to some interesting info about the construction of the shops:

http://ir.uiowa.edu/cgi/viewcontent.cgi?article=6327&context=annals-of-iowa

The part that interests me is where a transfer table was described as being part of the original design.  The table itself was long gone the first time I ever got a look at the place back the late 1980's.  That would have been something to see though.  When I look at the aerial photos, the outline is of the transfer table pit is easy to spot.  It also fills in the void where something doesn't look quite right about the track arrangement.  There's 1000 feet of shop there, but half has no tracks leading to the doors.  That's where the table came into play.

Let's take a look at some photos from Bing Maps Bird's Eye View.... here's the remainder of the Oelwein Shops shortly before they were torn down...


You can see the tracks coming in over the drainage ditch.  The picture is extra large, so go ahead and take a closer look.


When you take a closer look you can see where the transfer table used to be.

Next up, let's look at a couple old historical photos and a post card....


So that's how it was...


Friday, September 2, 2016

Janus Hammerhead Heavy Duty 61' Bulkhead flatcars

Janus Hammerhead Heavy Duty 61' Bulkhead flatcars


These heavy duty bulkheads were made to be run empty.  They don't have details, but they do have unique numbers.  At about 73' (HO scale) they push the limits of 22" radius track.  They are nice and heavy and run pretty smooth.  With some skill, a set of 10 or more can be pushed in reverse around 22" radius track very carefully, but like I said, with some skill and practice.


Setting proper coupler height is extremely important on long cars like these.  If you've ever worked with the 85' and 86' flats and box cars, you probably have some idea.

When the coupler height is just right then everything works, when it's off a bit then cars get stranded where the grade changes.  If the height is correct, then it's a sure sign that an easement is needed at that spot in the track.

On totally level track, these flat cars work very well in reverse.  They also perform best when using the uncoupling magnet rather than a pick.

On my test track there is a downgrade where it's readily apparent that the heavy weight is pushing the locomotive with some force.


Saturday, July 2, 2016

Making Inkjet Waterslide Decals Part 6

Making Inkjet Waterslide Decals Part 6


The next step in this process was to try Walthers Solvaset.  But first let me recap the process so far:

1.  Design the decals in Adobe Illustrator
2.  Print them on clear decal paper I got from ebay using an Epson Stylus 2200 with settings of:
  max quality, glossy photo paper, hi-speed off, edge smoothing on
3.  Light coat of Krylon Colormaster Clear Flat Acrylic
4.  Microscale Liquid Decal Film hand brushed on after the acrylic is dry
5. Cut, soak, apply....

Now we come to the Solvaset.

Microsol is good, but not quite as strong as Solvaset.  I needed something to deal with the fact that I sprayed acrylic on my decals in order to allow me to apply decal film.

The Solvaset is stronger, but it will wrinkle the crap out of your decals if you aren't paying attention.  I like to get a little Solvaset under the decal and then wait a bit before going over the top to avoid the extreme wrinkling.  But, that still doesn't quite make them totally deal with the look of the film.

There is another old school method that I haven't experimented with yet, and that's gloss coating the model then putting on the decals and then glossing and finally finishing.  That's the way I used to do it, but the problem is that it doesn't let me know how well my printing method is doing.  So until I get the printing perfect I won't try the gloss undercoating.

Once I get the perfect decal, we'll move on to the next step and that is finding the best after coating.  So far, Krylon has been having a great deal of difficulty completely curing under indoor conditions.  However, a couple model that sat by an open window did cure nicely.

The white ink and the gloss coat for the Alps MD-1000 has just arrived and there will be an update on printing the yellow and white decals on clear paper shortly...if you remember, I can't use the highest settings on the Alps without having the finish coating cartridge, but now that I have it we'll give it a try.

Friday, June 24, 2016

Alps MD 1000 printer in the year 2016

Alps MD 1000 printer in the year 2016


I got myself an Alps MD 1000 printer for the purpose of printing decals.  So let's get started with what works and what doesn't...

First, my printer came with the OEM disk and drivers.  I also got 2 sets of ink, and ordered 1 white cartridge and 1 finish cartridge from ebay.

The first thing I tried was to get it to work with Windows 7.  NO-GO, doesn't work at all and I'm really good at troubleshooting printer compatibility.  Next was Vista 32.  Again, not happening.

NEXT.....Windows XP Version 2002 Service Pack 3

Yes, read it again.... Windows XP Version 2002 Service Pack 3

This one worked with the drivers provided, no trouble at all and Windows Update found a Microsoft driver for the printer as well, but that one doesn't seem to work.

The Alps OEM driver does work with Windows XP Service Pack 3.

I printed some test pages, but right away I was unable to get it to goto the highest resolution because I didn't have a finish cartridge.  I found one on ebay for $8 and ordered it.

I tried a test print of some small logos, and they were terrible, but to be fair they also sucked on my Epson 2200 which is much higher resolution, so we'll revisit that with some higher quality graphics.

Next I tested some numbers and letters and they printed very nice.  So I put in some clear decal paper that is already coated with acrylic (so I don't waste a fresh sheet working out the bugs) and they printed out pretty decent, but again not on the highest resolution.

As I expected, they are pretty much transparent.  So the next test will involve using the finish cartridge when it gets here and attempting to do a white underlay.

Here's one thing I noticed about the Microsoft driver:  it allows you to change all settings without limit.

This would be perfect and I suspect it's here that the whole Service Pack 3 issue comes into play, so I think I'm going to tear down that machine and rebuild it with the best old parts I can find and install Windows XP again and try it 1 service pack at a time.  I should also mention that my XP install CD is for the Pro version.....


Making Inkjet Decals Part 4

Making Inkjet Decals Part 4


So I got my formula down, turned out some nice decals, applied them and they turned out pretty good.

However, I found out that after about 5 minutes in the water, some of them started to disintegrate.  To fix that problem I applied Microscale Liquid Decal Film.  Problem solved.

The next problem I encountered was that Micro Sol isn't really strong enough to handle the paper, the acrylic and the decal film all together.  I've ordered some Walthers Solvaset to find out if it's as strong as the old Hobsco version.

If it works like I think it will then it will be case closed on inkjet decals.  The method will be complete.

I've also tried using acrylic clear flat sealer and haven't been super impressed with the job that it did.  Some of that is due to the decal film, but like the paints I've been testing on polyurethane, it seems to have a very tough time drying.  Next up is trying Testor's dullcote again over the acrylic paint.

The next batch of cars to be painted will be painted with primer first.  I hate having to go back to using primer because the Tru-Color paint looks so nice without it.  But, it appears it will be necessary.

Now on to the Alps MD 1000....

Thursday, June 9, 2016

Making Inkjet Decals Part 3

Making Inkjet Decals Part 3


The last settings I used have worked out very well, so I went ahead and made some more and tried them without the Acrylic coating.  That didn't work at all.

After printing using the best settings available on high gloss and setting the ink to +%5 I tried using one without the sealer.  It didn't smear to the touch, but once in the water it essentially disintegrated.

I've also now printed a sheet of decals where I applied colored squares with white lettering on white decal paper.  So far so good, we'll see how they turn out after the sealer has cured.

Specifically, I made a bunch of the various stickers found on locomotive access doors.  They are super tiny, but nothing the printer couldn't handle.  With a magnifying glass the letters are totally readable and very crisp.

It will be the trimming that presents the tricky part.


Monday, June 6, 2016

Inkjet waterslide decals and more painting on polyurethane

More DIY Inkjet Decals and Paint Testing


1.  So the decals I made the other day and coated with satin acrylic have been applied, and so far they look pretty good.  The ink didn't run or flake.  I haven't clear coated them yet, but I did use Micro Sol when I applied them and it looks good.  You have to watch them as they dry because they will wrinkle up real bad if you aren't paying attention.  I use a tiny bit of paper towel to soak up the extra Micro Sol every once in a while.  I also make 1 swipe with the Micro Sol before I lay them down.  More on how they turned out later...

2.  Acrylic on Polyurethane.  I airbrushed a 60-40 91% alcohol to acrylic paint without primer on the polyurethane.  It took a while to find a decent setting for the airbrush, but about 60# of pressure and the needle backed off just a hair on the airbrush seemed to do the trick.  It took 2 coats and the paint is just a bit light, but I always like to use paint without primer if at all possible.  The paint did dry in about 30 mins.

Next...Acrylic clear coat...

Friday, June 3, 2016

Inkjet Waterslide Decals DIY

Making waterslide decals with your inkjet printer...

I've made a lot of decals with my 2 printers... Epson Stylus 2200 and Epson Stylus Pro 3800.  What I want to do now is start keeping a chronicle of what works and what doesn't.

This also includes my experimentation with painting polyurethane that has been cast in a silicone mold and then sanded.

First about the paint problem....  I made a bunch of flat car bodies and have had some mysterious results where the paint never dries on the models.  This is true of Testor's Enamels, Tru-Color Lacquers and Testor's Dullcote and Krylon Color Master Clear Acrylics.

As I solve the paint problem, I'll post more.  So far though, several paints haven't fully dried and remain either wet or tacky.  Days next to a fan didn't help, but a warm day and night by the open window did help.  I suspect that direct sunlight and outside exposure is the key to the current problem.  But, the next next batch is going to be acrylic so we'll see what's up.

Now on to the decals.  The best results so far were when I printed on this setting:  enhanced matte, 2880 dpi, +5% ink. Wait 5 days, spray with Dullcote.  Problem, the film doesn't dissolve and is super tough to conceal.

That was then, this is now:  premium gloss, 2880 dpi, -5%, wait an hour, Krylon Clear Acrylic Satin.  We'll see tomorrow how that works.....

Sunday, April 10, 2016

Janus Hammerhead 62' Bulkhead Flat Cars

Janus Hammerhead

HO Scale 62' Bulkhead Flat Car

These polyurethane flat car bodies are very easy to assemble.  You have to supply you're own couplers, trucks, screws, washers and weights.  I've used a variety of roller bearing trucks and both 33" and 36" wheelsets.  You use washers to adjust the height of the trucks in order to line up the couplers with your height guage.

There is no beam down the center so there is a ton of room for adding weight.  It's pretty cool that you can weigh them down without having to put a load on top.

I used my Cricut Explore to make some wood decks out of thin bass wood I picked up at Hobby Lobby for $3.  One piece of wood can make at least 2 decks.

I had no trouble negotiating 22" radius curves on my test track and the cars stayed together through all the grade changes I have.

It took me around 10 minutes to wet sand 1 body by hand and about 5 minutes when I used my Central Machinery 43533 slow speed grinder I got at Harbor Freight.  I also used the disc sanding configuration on my Zhouyu 6 in 1 Machine and that worked really well.  Probably the best configuration of that machine to date, but I haven't used the lathe yet.

Polyurethane makes a super fine dust and seems to be quite static.  Even when wet sanding the dust eventually dried and blew around the room a bit.  Definitely wear a dust mask with this project.

I tried both bondo and tamiya putty and they worked great.  Once cured, super easy to sand.  the bondo has the advantage in that it cures so fast.  It's totally possible to do several of these cars and put on the first coat of paint within an hour.

When you want a lot of flat cars real fast, these work.  They aren't even remotely close to being super realistic, but even a few details can make them appear impressive from a short distance.  In groups, they look pretty good.

Here's the ebay pix:


Monday, January 4, 2016

Zhouyu Machine 6 in 1 milling machine and lathe

Zhouyu Machine 6 in 1 milling machine and lathe


I've been looking at this thing on ebay for quite a while now.  I don't have any experience with milling machines, but I'm not getting any younger and the accuracy of freehanding a moto tool is getting worse.

I didn't want to spend a lot of money on a machine when I don't really know how they actually operate.  That's when I discovered the Zhouyu Machine.  It's a learning toy basically, and since I'm just learning, for less than $200 I could at least get an education.

The very few reviews and comments I could find about this machine are almost all totally negative, but have essentially the same reason:  not suitable to machine metal.  Since I work with plastic, I decided to dig deeper.  I found a video on youtube, that I didn't bookmark, that showed a guy setting this thing up into all of its different configurations and testing them.  He didn't have any negative comments and he understood this is not a machine for working metal.

Then he said something that stuck with me....the machine comes with tool blanks that you use to create your own custom tools.  I then talked to an old school machinist and asked him what he thought.  He told me that since it's a kit, the best course of action would be to use the machine to create improved components.  This seemed like a genius idea and I went ahead and bought it from prettyworthshop on ebay.

http://stores.ebay.com/prettyworthelectronics/

Here is the picture of the box:


The machine is super simple to put together.  Once you know how everything attaches it's a simple matter to configure the machine into any of models shown.  I even configured it to something not shown and it worked just fine.

Here are the component storage bins:


The first thing I made was the vertical mill.  I wanted to see if the machine was better than my freehand sawing.


So this was my first experience using a vertical mill.  I wanted to remove the grill from the top of an Athearn Blue Box U28C.  The vise is plastic and much too small for a piece this big.  Needless to say the accuracy wasn't that good.  But the solution to that problem is simply a better vise.  Also being plastic, the torque of the tool can push the piece out of alignment easily.  I did find that setting the depth of the cut is very important for accuracy, something that would have been obvious to an experienced machinist.  My depth had too much tool engaged at one time.  When I backed off, the accuracy improved considerably.

Since the speed is slower than a moto tool, there is a lot less melting during the cut, which I really liked.  To finish my cut I used a razor saw cutoff wheel and that made a huge difference.  The razor saw had no melting and the cut was very accurate.

A drawback is the short travel distance.  The vise has a wheel to move it an inch or two and the rail will allow you to move the vise several inches.

I placed the machine on top of some tool box liner that held it in place very well.  There isn't a lot of weight to hold it in place, but the liner is a bit sticky and held it nicely.

The next step for me is to build a better vise and give it more travelling distance.  Since every part is replaceable I don't think it will be much trouble to make something bigger.  Also, it's a simple matter to bolt the machine to the bench, which I haven't done, but that would increase accuracy quite a bit.

The machine has several collars so any dremel bit will fit this thing just fine.