Monday, December 21, 2015

MP40 fan housing

MP40 Fan Housing


So I needed to make a custom housing for the screens that cover the Maelstrom Death Touch fans on the MP40.  I fired up inkscape and made the screen cover and used my Cricut Explore to cut it out....turned out awesome....

This is the inskscape shape:

Here is the test cut on card stock next to the scribed styrene:


And here is how the test fit looks, it's just a bit off in this picture, but it fits perfect


Thursday, December 17, 2015

The sound of starting a 40 cylinder diesel

Here it is the sound of the EMD 1290.

40 cylinders, 7200 horsepower, 4 turbos...

Cold Startup 40 cylinder diesel

MP40-1290 Preview

Here's the mock up preview:


First Bondo Day on the MP40-1290

First Bondo Day

First I had to finish the milling and rough sand most of the shell....


Next I assembled the blower housing


Using the chopper, I made some styrene panels and attached them with Plio Bond in case I made any mistakes.  Using Testors or CA is somewhat risky when fitting panels because the fit has to be perfect, with contact cement there is always the ability to make one more cut if you have to.


Now to mix up some bondo... that's about 2 tablespoons and half a cap full of hardener.  This will give 5 minutes of working time.


With 5 minutes, I can fill the sections and immediately trim the bondo while it's the consistency of rubber.  I can even clean my glass plate I use to mix it on.


5 minutes later.....not a huge amount of sanding to do and a nicely fill shell...


Wednesday, December 9, 2015

Maelstrom Death Touch 4000 Super Turbo 60" Fans

Maelstrom Death Touch 4000 Super Turbo 60" Fans


And the MP40-1290 project continues... here's a couple pics of the new fan set:


This is the proposed layout of a 40 cylinder 645 ceramic and teflon coated power plant:


The retro future builders plate:


And here it is in the box:


Saturday, December 5, 2015

update on modelbuildings.org Shipping Containers aka CONEX

Here's an update on the package of shipping containers, also known as CONEX's from:

modelbuildings.org

Since my first review I've learned some better techniques...

Somewhere I had stumbled across their video on youtube (which is on the page in the above link) and thought this would be kind of a fun project for me and my 6 year old daughter to do.  The video shows a pretty cool method of making CONEX's of various sizes and you can make as many as you want forever once you have the package.  It comes as a set of PDF's.

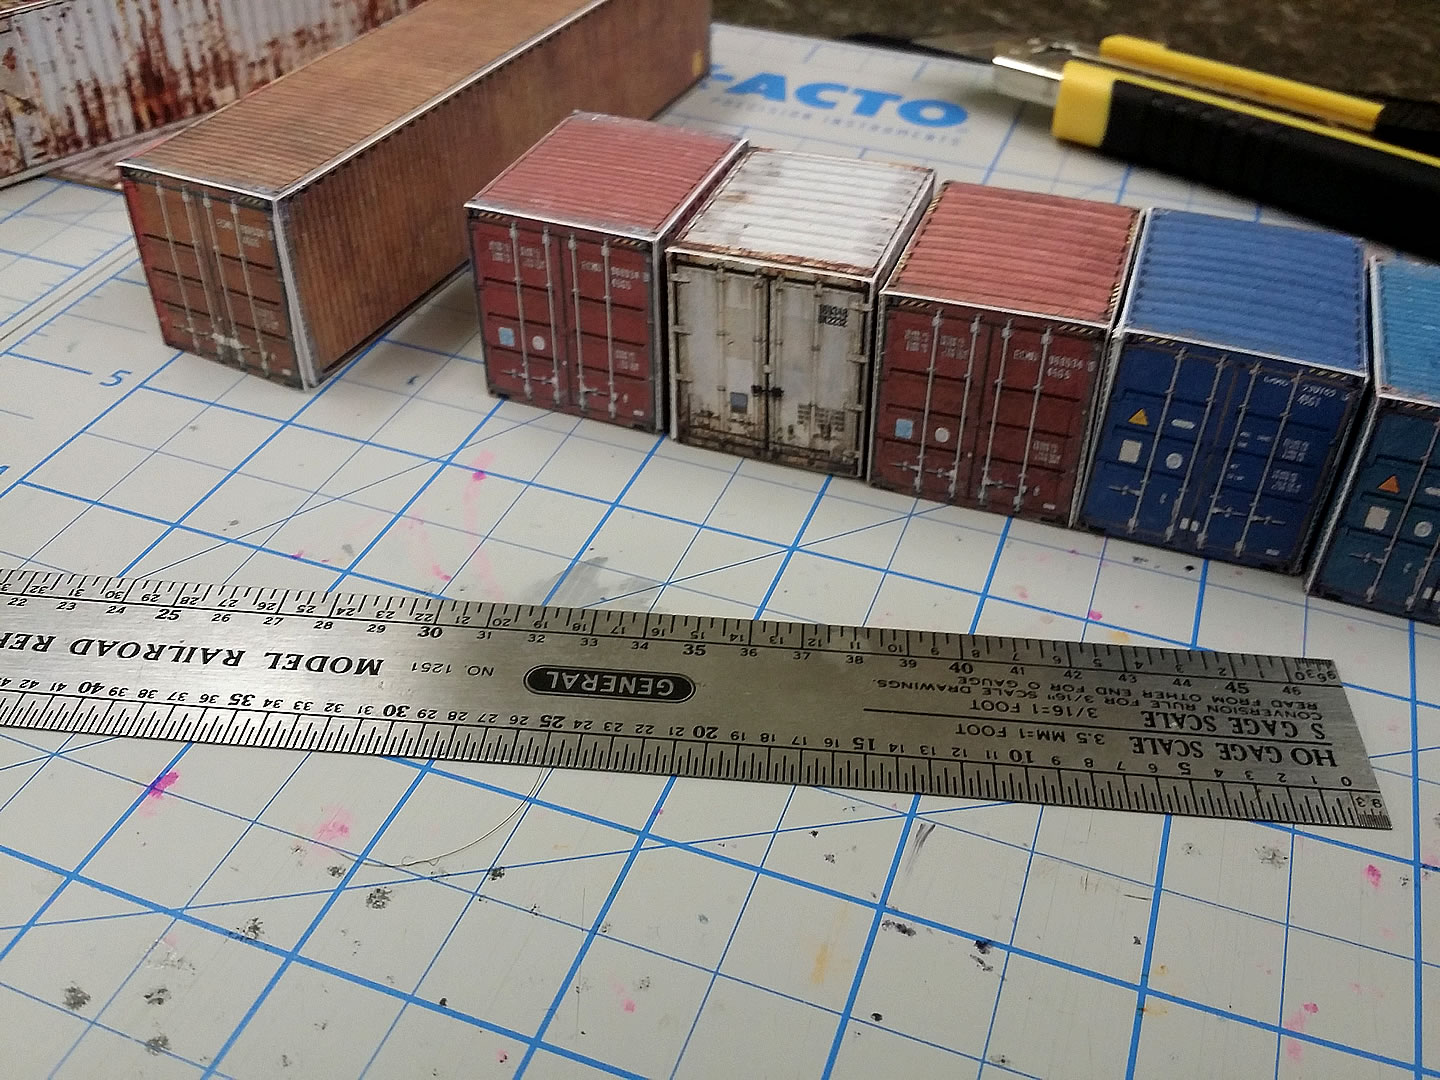
So let's start with the pictures and then I'll tell you what I learned after making 15 of them...

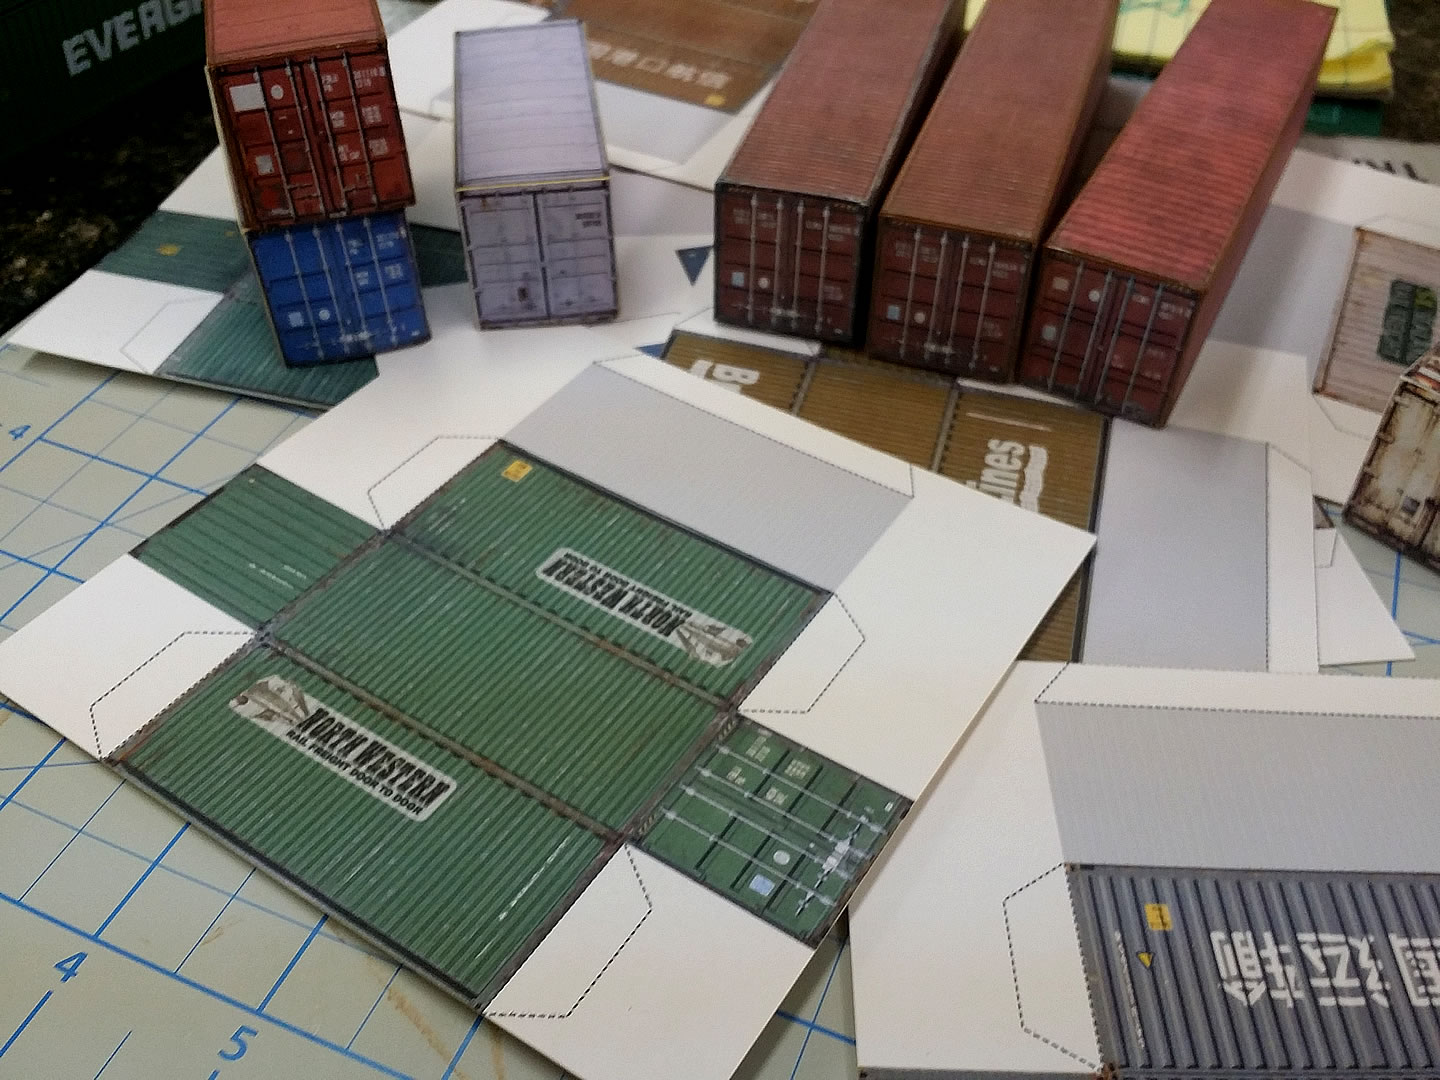
The green Evergreen containers are regular commercial products that cost about $10 each
CONEX 1

Here are some 10' containers, I don't recall ever seeing any 10 footers you can just buy, but 10' containers are very common in the military:
CONEX 2

Here are some containers ready for the assembly process...
CONEX 3

The whole package was $27. I love this product.  My first thought was that I could make my own using this method and some photographs, but for 27 bucks there is no reason to go through all that trouble.  There are 40 different containers that come in several sizes. There are 40', 20' and 10' containers in the package.  The website breaks down exactly how many of each kind.

Watching the video shows exactly how to make them. It's super simple - print the container you want, glue it to cereal box card board, trim it, then score the folds and glue it. Done.

So I used their method for the first one.  It worked fine, but I've got a lot more experience in printing and mounting and have several tips that makes for a better finished product and takes less time.

1.  I use Epson S041062 paper.  It's a superior paper and 100 sheets can be had for $15 or less.  I use Epson Stylus 2200 and 3800 printers, so I had tons of this paper on hand, but on my very first print I used my Epson WF 3640, which is comparable to what most of you will be using.  The print was pretty good.  The paper makes a ton of difference, I also used plain jane copy paper and that one was usable.

2.  I used the cheapest card stock that I got at a surplus office supply place for about $5.  THE COLOR OF CARDSTOCK DOESN'T MATTER. I wasn't about to go cereal box hunting.

3.  I've got tons of experience in mounting methods and this method is by far the fastest and cheapest:  They show gluing by hand, but way faster and much better quality is to buy Elmers Spray Glue.  It's cheap.  3M photomount is awesome stuff, but just too much money for this project.  YOU DON'T NEED TO BE ACCURATE WHEN MOUNTING, JUST GET THE PICTURE ON THE CARDSTOCK, DOESN'T MATTER IF IT'S CROOKED.

4.  To get a really good mount, you should have a roller that's used in gluing countertop materials to counters.  They usually have a longer handle and have a little weight to them.  A speed roller will work, but it's harder work.  A kitchen roller also works, but still harder work.

5.  Once mounted with Elmer's Spray Glue, you can start cutting right away.  I printed all 8 20' containers and mounted them all at the same time, took like 10 minutes from starting the print job to being done with the mounting for all 8.

6.  I learned the hard way that you **MUST** use a steel ruler and a heavy carpet knife.  On my first try I used an engineer's scale (triangle shaped) and an XACTO knife.  It was tough to cut all the way through the card stock where needed and I ruined my scale by shaving off the edges continuously.  So I got out the carpet knife that had some good weight to it and a wood school ruler with a metal edge....the heavy knife shaved the metal off the ruler.  Finally I used my model railroad ruler and that worked very well, but to protect it from getting the edges shaved I got a heavy steel ruler for $2 at a discount tool store.  That solved all the problems.

7.  The video shows them using CA to assemble the container.  That was a bad idea.  First, I got it all over my fingers.  Then any place where you glue, but are off by even a little bit, becomes a permanent defect.  My first few containers are just a bit crooked.  I switched to Elmer's white glue and used a large steel bolt to hold the container down while the glue cured.  The white glue made all the difference in that the finished box can be squared up after the glue has been applied and a little weight on top holds it right where you want it.

8.  When complete you will see the color of the cardstock in all the edges of the container.  I found using oil chalk that sort of matches the color of the box works really good to give it the finishing touch.

Now, the real reason I like this product is that these containers look pretty good and cost maybe 20 cents in materials. The ink may cost more on a printer with fewer cartridges.  They take less than 10 minutes to assemble after being mounted.  I trimmed several at a time.

They aren't really that good for putting on a train, but if you want a huge yard full of containers, then this is perfect for that.  With single containers costing around $10, it's just not really feasible to have a yard with 500 containers sitting in piles.  Also not a wise use of money for a totally static display.

If you use Google Earth do this: turn on 3D buildings; under more-transportation turn on railroads; turn off streets in the primary list.  Next goto the Port of Long Beach in LA and zoom in on the container shipping area.  You'll see the storage blocks.  The closest ones to the ships are 100 columns by 15 rows by 5 stacked.  That's 7500 containers for just 1 of the approximately 40 blocks.  If the place was full that would be around 300,000 containers.  That's just 1 of the many loading areas on Terminal Island.

With these paper containers you could make a very large terminal for very little money, and it can grow over time.

If you played your cards just right you might get the wife to crank out a few of them with a TV tray and a movie....

I really like this product. I haven't tried any of their other stuff, but I plan to take a closer look.

Wednesday, October 28, 2015

Containers made of Paper

Paper Containers


How many of you have seen this video:


I watched it.  At the same time I was trying to think of something my daughter and I could do together for our Thursday art project.

I've got considerable experience in photo printing and photo mounting and this video caught my interest.  It looked good enough that I went ahead and bought the whole package of containers.  This is my report....

Here is the link to the place I got them from: http://www.shippingcontainermodels.com/

First, let me show you how some of mine turned out:


Pretty cool actually.  What I have to say about these containers is that, while they won't likely be carried on my well cars, they will help me make a massive container facility.  They cost next to nothing to make.  Once you pay your $27 for a set of pdf's, you can make as many as you want as often as you want.


It's as easy as they show in the video.  After making about my 3rd container, I got it down to making several at a time.  I'm going to do an experiment in a couple days where I see how many I can make while watching a movie.

Here are some tips I have for an improved method of making these containers:

1.  They look fine on plain paper, use regular paper for most of your work.  Using high quality presentation paper makes them more vivid and is better for the most prominent containers that you might photograph or scenes where only a couple containers are present.

2.  Use regular Elmer's Glue All (plain white glue) instead of super glue, it has working time that super glue doesn't.  Also, the first couple I made got a ton of super glue on my fingers.

3.  Use card stock instead of cereal boxes.  It's easier to get and you don't have to raid all your cereal boxes.

4.  Use Elmer's spray adhesive (or for 3x as much money use 3M Photo Mount) to attach the paper to the card stock.

5.  Don't worry if the paper and card stock don't line up because you're cutting it up anyways.

6.  A heavy roller used for countertops and laminates works the best for smoothing the paper and card stock after you use spray adhesive.

7.  Use a rotary cutter if you have it to do the rough trimming, if you don't, then use a decent box cutter and steel ruler for the cuts where you cut material away.  I wrecked 3 different types of rulers before getting out the steel ruler.  The wood ruler with the metal strip is now the wood ruler that formerly had a metal strip.

8.  For the scoring, an xacto #17 blade and a machinists ruler works great.


I'm making some more so I'll continue to update on this project.....


Saturday, July 4, 2015

The Kumu Diagram

I'm working on planning for my next layout, which believe it or not is basically a 4-6 track loop.  So what I did was take some of my data and use a social engineering diagram algorithm and this it what I got so far:


I used the Kumu website to do this and Adobe Fireworks to make the image.  Check it out, it's kind of interesting.

Saturday, June 27, 2015

Update of Heljan B807 Brewery

So I put two Heljan B07 breweries together for my massive Apollo Brewery complex and here is a little update on what the look like without the side buildings...


Piko BR 55 and electrical shorts

So....you've got a Piko BR 55 and it doesn't run, in fact the red light on you transformer comes on anytime you try to apply power to it...

This is the model we're talking about:

This thing is a bowl of spaghetti when it comes to electrical.  If you fix anything on it you will cause a short in the main pickup underneath.

I've just recently repaired a number of these locomotives and have found them to be advanced projects.  Getting the linkage right after quartering requires a hell of a lot of patience.  There is only one way it can be done, then you have to rotate the wheels to do the same thing on the other side.  Once you do that the previous side needs be done all over again.

Next, if you touch the linkage at all after you're done, you will be starting over, only this time you will notice that a couple bushings have come out forcing you to start again. Each time you get back together another bushing will come out.  Once you reach maximum frustration you will glue them all back in place permanently.

Finally you get it all together and then test it only to discover it shorts.  This short will be the toughest thing to troubleshoot.  And guess what? The first thing you have to do is disassemble everything.

After finally isolating the short, fixing it and putting it all back together - you will find that there is another short.  The last short is the toughest to cure.  You could hard wire everything, but that creates a problem with tolerances.  You can also insulate everything and that has its own problems.

Finally you choose a method of fixing the short and it works.  However all the linkage is hanging down and you back to step 1.

Have fun with this one...

Saturday, June 13, 2015

Small Plastic Gear Repair

I was working on a Piko BR 86 that had a worn out idler gear.  The locomotive could run forward, but not backward.  Upon inspection of the gear I observed that the teeth were worn away on the side engaged when going in reverse.

I researched everything I could find about methods used to repair, remake and fabricate gears.  I learned a lot and chose to try a method where I would use baking soda and super glue.  When mixed, these two products make a very hard cement like substance.

My plan was to carefully wrap the gear with foil and then apple the baking soda and super glue to the gaps.

Once I had the foil on I noticed that it was a lot more durable than I expected.  The method of making the foil fit the gear is to turn it with its mate.  While doing this I noticed that it actually worked pretty good.  There's a few rips and tears, but they don't matter because the gear is just slightly bigger now making for a deeper mate with the worm gear.

Another benefit is the fact that the torque of the metal worm gear is applied to another metal surface making for a smoother working part.  So I just added a couple drops of superglue to hold it in place and it works pretty good.  When it finally wears out, it's easily replaced.

Here's a picture:


Monday, June 1, 2015

Caring for and Quartering of Steam Locomotives

Caring for Liliput Class 91 2-6-0 Steam Locomotives

  1. DO NOT handle the locomotive by the drivers or they WILL bind and the locomotive will stall and need to be quartered.
  2. Use two hands to handle the locomotive and beware small details – one hand on the cab and one hand on the valve gear.
  3. A Rix Railer is a nice tool to have when placing locomotives and cars on the track.
  4. DO NOT run the locomotive at maximum power if at all possible – the locomotive has enough power to throw itself out of quarter even without moving a train.  Slow speeds will keep the locomotive from binding.
  5. If the locomotives stalls, expect there to be a bind in the drivers that requires quartering.
  6. To prevent binding, an eyeglass screw has been used on the fireman’s side front driver.  At high speeds or heavy loads you will throw this rod off.  Gently replace the driver back onto the screw and reduce speed or lighten the train.
  7. The main gears have been lubed with white lithium.  This grease is especially good at NOT spreading all over everything.  When cold, this grease is stiff.  A couple medium speed warm-up laps results in a very smooth and quiet operation.
  8. DO NOT perform a torque test. This is not a diesel locomotive.  The torque test will cause a bind and will require the locomotive to be quartered.
  9. Operate with small cuts of cars – this is a small shunting locomotive that was not meant to shove heavy trains.  Build trains a few cars at a time and leave the heavy work to heavy class locomotives.
  10. You can learn to quarter your locomotive.  First study the forums and all the advice you can get then apply this rule:

On the Engineer’s side all driving lugs are placed at 12 o’clock.
Rotate the loco as if on a turntable.
Now on the Fireman’s side all driving lugs need to be matched at 3 o’clock.

Think carefully before twisting a wheel into proper quarter.

One wheel at a time.


Have patience.  This skill is very hard at first, then very easy once you catch on.

After you fail 3 times, stop and goto a Yogi and have him slap you in the face 27 times then drink a 6 pack of beer and start over.

Friday, May 22, 2015

Marklin Layouts and DCC

So I have a friend who is a Marklin modeler.  His thing is scenery, but with this new layout he has he got Marklin DCC and asked me to do the electrical.  Now I've never worked with AC trains before so I was a bit unsure of what to do.  I studied up a bit and brought my tool box over and went to work.

First thing that happened was I determined that we didn't have the right power supply, completely wrong model.  So he over-nighted the correct power supply but it came with a bare wire adapter.

So I went to Radio Shack which was still open but almost empty and they still had the plug matching station with most plugs still on the rack.  The M plug fit the best, but they didn't have one, so I took the next best thing which was the K plug.

I installed the K plug and and tested the voltage at 20 volts.  Everything was perfect.

Then, since I can read German I was easily able change the language on the Mobile Station to English and start using the functions to troubleshoot the trains....

One at a time I tested the 3 locomotives.  2 only buzzed very faintly and 1 does run for 8 seconds then stops.  Then when I press the stop button again it goes another 8 seconds, but no reverse and no speed control.....

and the troubleshooting goes on.....

Thursday, February 19, 2015

Old GE U and -7 series rebuilds B36-7 U30B U28B

What is on the Bench Today

Here is what I got going on today:


So what are they and more importantly: why would anyone do a thing like this?

Since I'm modeling a large belt railroad that goes around Chicago outside of the EJ&E loop, I need locomotives to represent the interchange.  These 5 units are all being rebuilt and upgraded and will be called B38A2.  I got a little crazy with the saw on one unit as you can see and had to cut in a section of an SD24 to make the cab fit.  Yes it's crazy, but really fun.

All of these are going to be CSX with the Yn3b paint scheme.  The story goes that CSX needed more 4 axles locomotives and bought these 5 rebuilds from VULCAN Industries.  They have huge anti-climbers and the new 16-252 engine from  Fairbanks Morse, which is the ceramic version of the 16-251, and yes that is the ALCO prime mover that is still being built by Fairbanks Morse.

3 of these are Athearn Blue Box, the one with SD24 cut in is a U36B with the original 8 wheel drive and the final one is a U36B with the pancake motor.

The old 8 wheel drive was tricky to get it running smooth. I tried everything I knew.  In a final act of desperation I sprayed contact cleaner on the brushes and WD40 everywhere else and suddenly it came to life and runs super smooth.  I would say it will have a rating of Mission Capable around 70%.

The Athearns are 2 with the gold motor and 1 with the old motor.  They are run very smooth after a total tear down and rebuild.

Finally the pancake Bachmann...it looked like it had spent a couple years in a sandbox, but when I removed the shell there was an almost never used motor in it.  It runs great and the circuit board makes DCC so easy on this one.  Super quiet and smooth, its really unbelievable.

OK...back to the bench....

Friday, January 9, 2015

Precision Gears after the casting

Precision Gears after the casting

So I made my mold and cast some gears......

This is what happened - I did the deed and made some gears.

The gears actually turned out pretty good, but my resin is way to flexible and the gears, while nice, are to flexible to put into service.

Now I have found the proper resin to make gears and new instructions to make the mold so I'm going to give it another shot....