Wednesday, December 24, 2014

Bachmann Cracked Gears and their Replacement

The Merry Christmas Edition


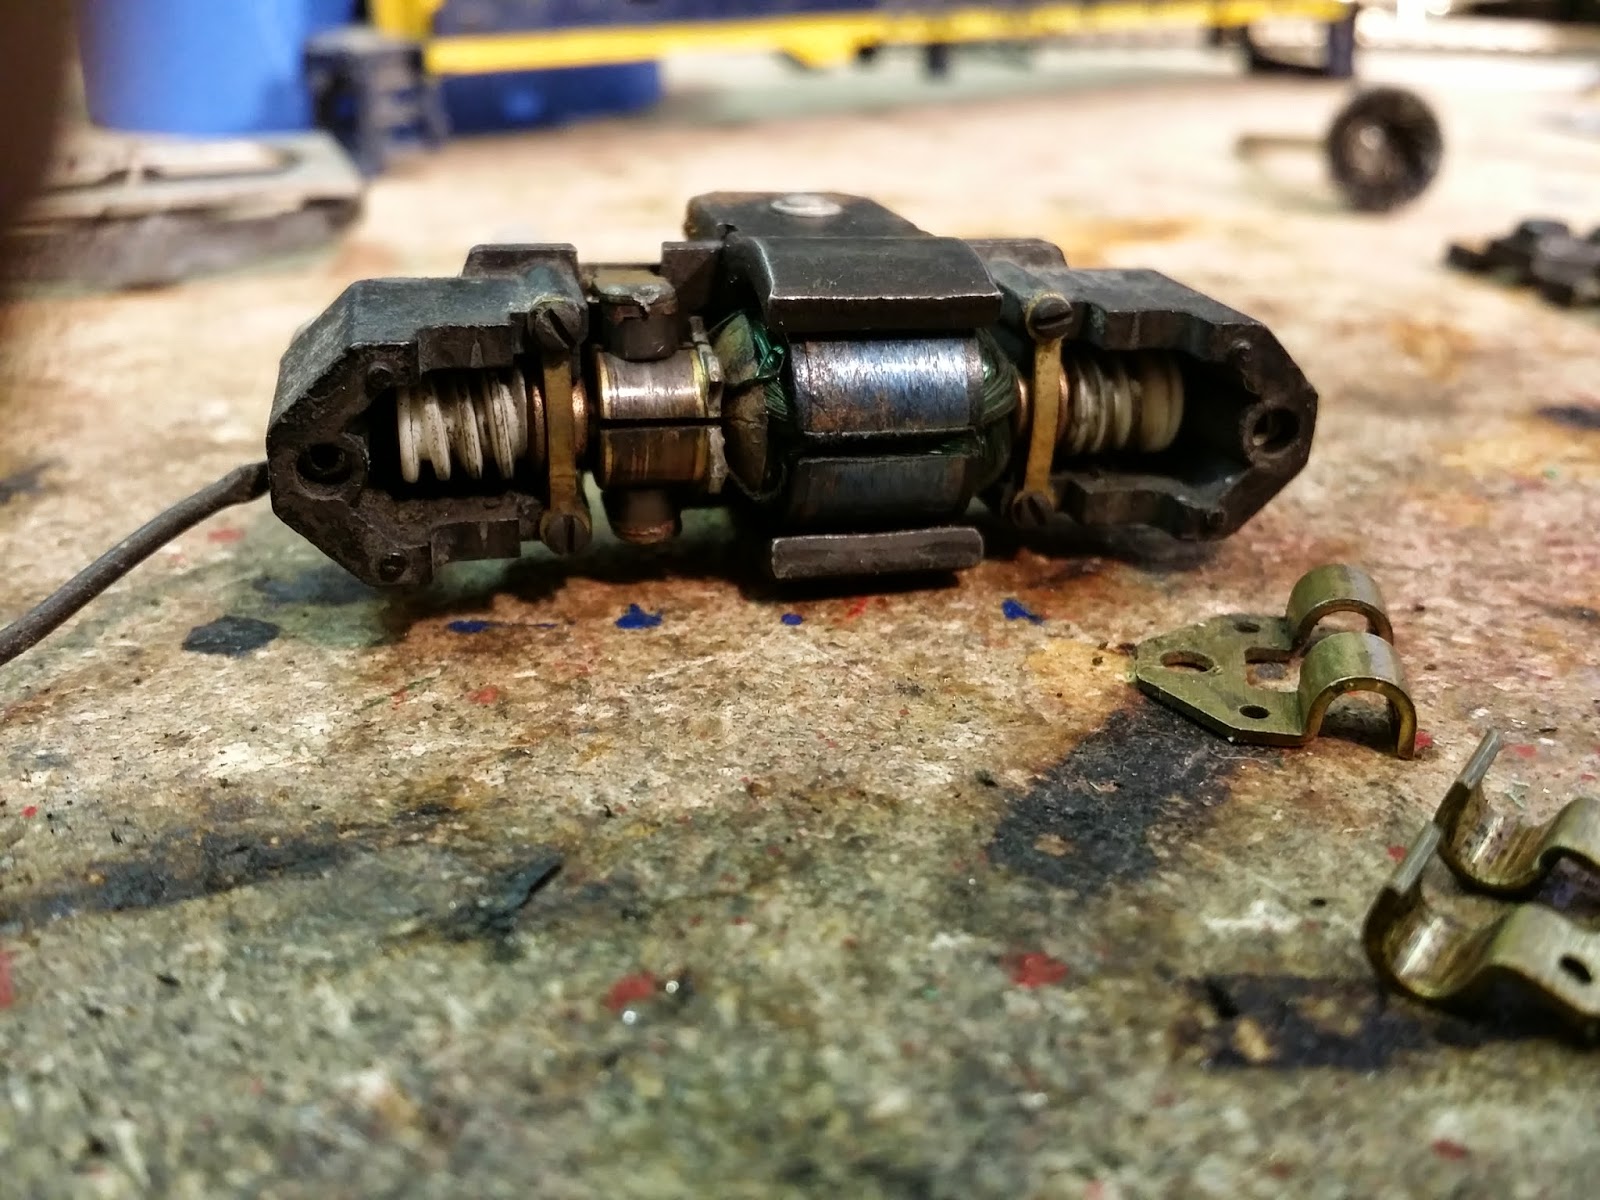
So as most of you already know I have a thing for Bachmann and Life-Like pancake motors.  I've said many times why I like them and detailed how to repair them.

Now it's time to take things to another level...

Cracked Gears


This is problem that plagues many modelers today.  They want to know how to replace cracked gears for whatever reason and get no help on any of the modeling forums.  Most replies are to junk the engine or turn it into a dummy or more completely unhelpful information.

I've been studying the methods used by hobbyists who fly drones.  They generally use a lot of repair parts.  Some of the frequently used parts is several types of small precision gears.  Usually it is not cost effective or their is an accuracy problem with 3D printing these gears.

In their forums a several articles on making these gears by using a mold and casting material.

I've done lots of casting of parts, especially parts that are no longer made such as Tyco sideframes which are frequently missing when purchased on ebay or at a train show.

I decided I would give it a shot and mold several gears that most frequently cracked in Bachmann and Life-Like pancake equipped locomotives.

The primary reason I want to do this is because most modelers tend to be really hard on those who want to repair and restore this type of locomotive.

Another reason is to many modelers these locomotives have sentimental value.  For example, I love my collection of Tyco Golden Eagles.  I also like the like my Bachmann E60CF and I have a huge project going on with a number of Bachmann E60CP.

My projects with these locomotives involve a lot of chopping and scratchbuilding, something I love doing.  To do my E60CP project I required 4 of these locomotives.  Yes there are newer versions with better mechanical, but this project isn't something I want to spend almost $1000 dollars on.

The final reason I'm doing this is because so many people say don't waste your time.  I don't listen to people who say "can't."  I intend to perfect the technique and then post it to the forums.

Right now I've started with 2 gears most commonly found cracked.  I've 2 of 1 type and 1 of the other type in the mold and after 24 hours I'll take them out and make my first cast in polyester resin.  So far I've found this resin has the strength do the job very well.....

We'll find out what happens by Saturday.  If it works I'll post my method here.....

Monday, November 3, 2014

Fast Tracks Switches Part 3

Fast Tracks Switches Part 3


Well my first try with Fast Tracks turned out pretty bad.  And if you remember I did a little reflection later to see if I had learned anything.

So now I've made my next switch and it went a lot better.  I haven't installed it into the test track yet, but will shortly.

Here it is:


The final product....I'm not that good at painting and weathering track yet, but at least it seems to be working ok.....


What I learned this time around:

I was planning hinged points after my first experience with continuous points.  After watching the videos, I was a bit concerned about pulling it off.  I had already built everything with hinged points in mind, and then I discovered that if I just did nothing and didn't put in the hinges everything seemed to work just fine while still appearing to be continuous points.  I'll post an update on how this works out.

Friday, October 31, 2014

MP40DDAX

MP40DDAX


So I've been working on a new switcher....the MP40DDAX

Yes, it's totally badass.  So check it out and then I'll answer a few questions....


Parked in front of my Apollo Brewery...


FAQ:

1. The front is so far away how does the engineer see whats going on?

Answer:  Thanks to military surplus, the engineer has a 32" plasma screen that provides 360° vision via the Commander's Independent Thermal Viewer (yet to be added to the model) which is located at the front.

In addition, the viewer will be supported by the brightest lights I can mount and infrared both passive and active.  Same system used on the Abrams Tank.

2. This thing is totally ridiculous, why did you make this abomination?

Answer:  Because my 5 year old daughter told me to.  She saw the new MP15 cab set and said that it belonged on a DD40 sitting on a work bench.

3. It's way to long to actually work, how will you solve the coupler problem to negotiate 22" radius?

Answer:  there will be a Steam Punk swinging coupler arrangement that will look like something out of Japanese Anime.  And it will be badass....

That is all for now.....


Thursday, October 23, 2014

Fast Tracks Switches

Fast Tracks Switches


OK I have to retract my earlier conclusions about Fast Tracks......

I'm not making any more continuous rail switches.  From now on, they will all have hinged points.

Why?

Because without hinged points the damn things are impossible to switch.  My ground throws have been actually torn apart by the force of the continuous points. So the next batch will all be hinged points and I'm going to be removing all the old switches and doing them over.......

Cricut Explore and Decal Cutting

Cricut Explore and Decal Cutting


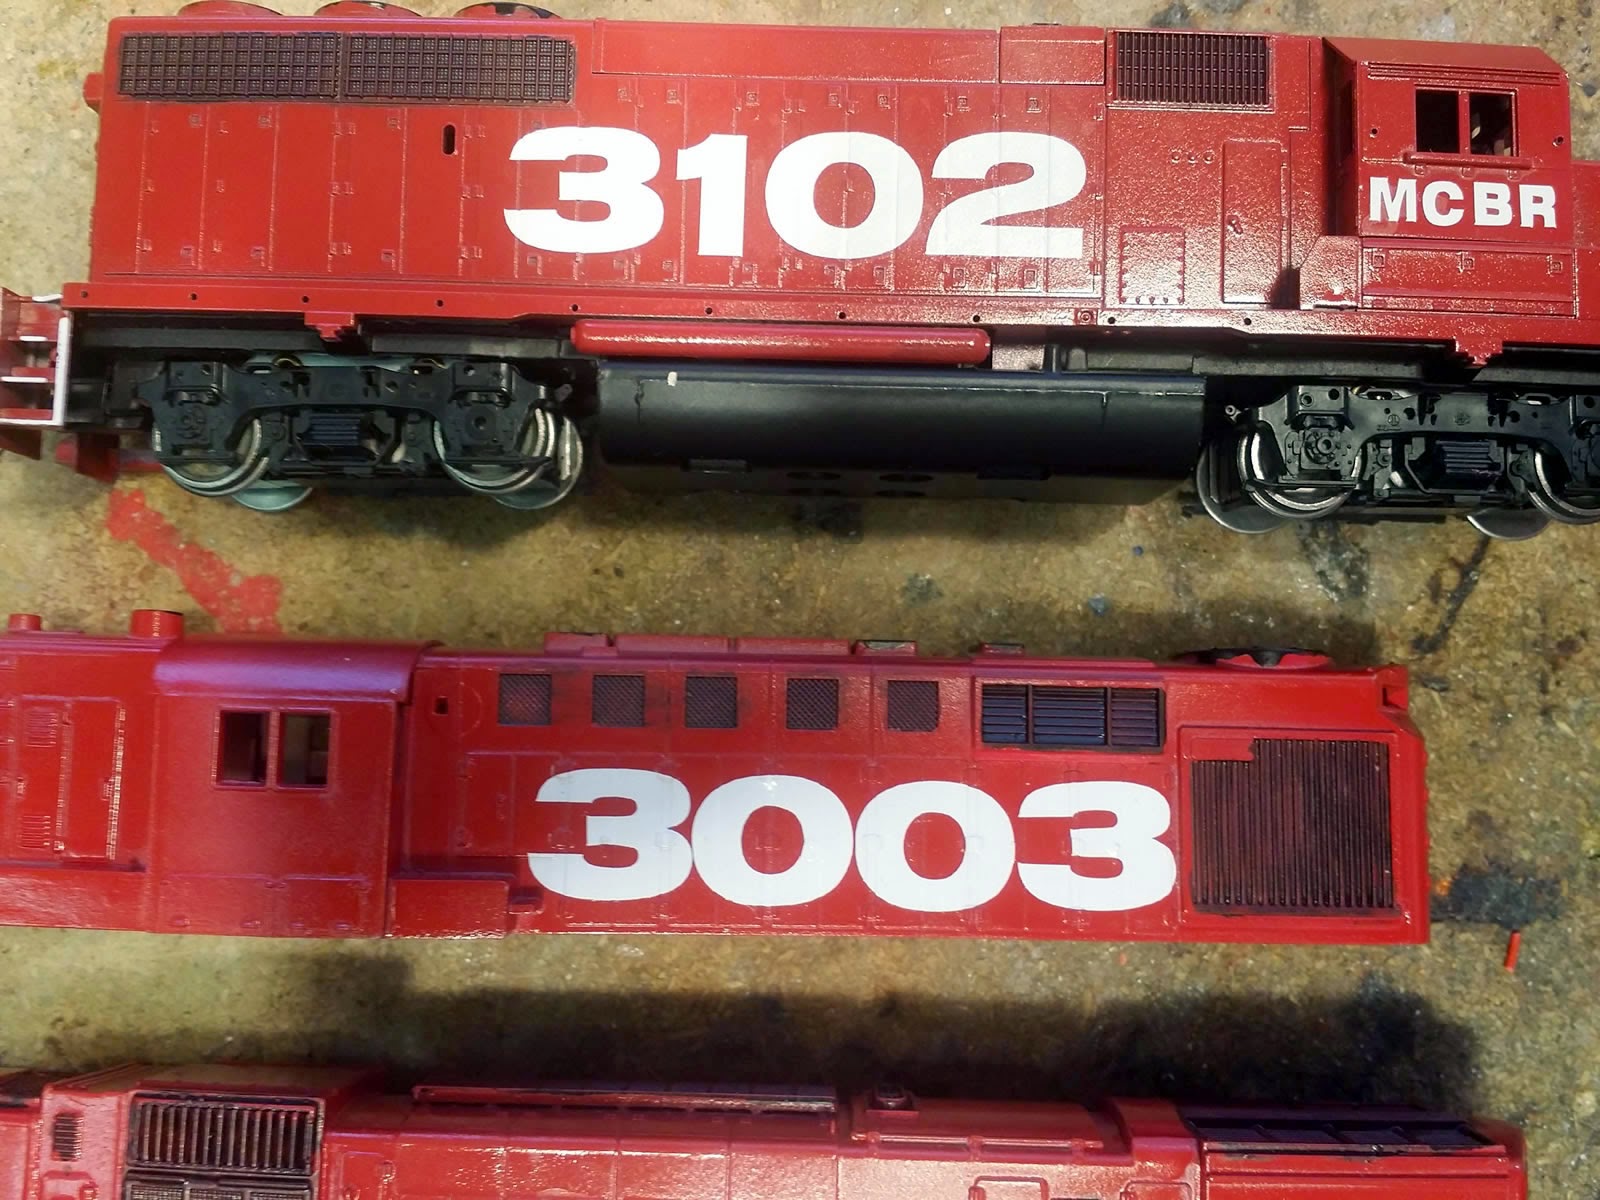
I've been experimenting with my Cricut Explore and cutting decals.  One of the things I decided to do on my new railroad was to have huge numbers on the side of each locomotive.  This accomplishes something important....namely makes it easy for me to see the number of the locomotive I want to work with.

There really aren't any decent ready made decals to do what I want to do so I decided I would give my Cricut Explore a shot at cutting numbers on blank white water slide decal paper.

First I tried printing a yellow box and cutting out the numbers so I could have them all be yellow.  This didn't really work out because once you clear coat the decals, solvaset has a tough time forming them.  So I decided to take the path of least resistance and make them white.  I'm quite pleased with the results.

In the future I'll revisit colored cuts, but for now take a look at my white numbers....

One note:  working with decals much larger than normal poses its own challenges.  Never use solvaset until you are sure you have the decals in position, if you do you'll be doing it over.

Here's some pix.....


Friday, September 5, 2014

HO Scale Working Hump Yard


So I have this test track and it sits on the carpet running round the edge of a room.  I used the the Life-Like Power Loc and some Life-Like flex track to build it.  Along 1 wall the track runs about 10' on flex track that has some carpet tape to hold it in place.

At the corners where the curve starts I used Power Loc...2 sections 22'" then 2 sections 9" straight followed by 2 sections 22" radius curve again then back to straight.  Then the Power Loc continues around the next 2 curves and back to flex and back to Power Loc and then into the 10' section of flex.

For the transitions I used just plain old wood door shims with some carpet tape.  My daughter wanted a large cardboard tube for a tunnel where the track runs under a credenza so a couple more shims on each end of that.  Then there is a spot close to the wall where a couple shims where needed on the Power Loc curve due to a slight bulge in the carpet.

In total there are 7 grade changes  between ¼" and a ½".  It took a lot of tweaking to get this to work out just right.  When all couplers are correctly height adjusted everything works perfect.  This is one way I use to identify locomotives and rolling stock that have couplers to high or low.

I usually pull 15-20 cars in a train on this track with 2 locomotives.  I have just a handful of locomotives that can do it alone -  GG1 can pull anything I thrown at it with no problems at all, a Bachmann pancake motor GP38-2 High Nose can do it and my Tyco C630 Power Torques can do it also.  There are a couple others that will surprise you also, but I'll save that for later.

There is one section of uphill grade for about 10' that tests locomotives and plastic couplers.  I don't have a good solution for getting Kadee #5's in those locomotives because the Bachmann couplers fit perfect..  I'll think about that one later.

All of this experimenting has lead me to believe that I can construct a working hump yard, but not in the way you would think....

What I have in mind is this:  a long lead track of about 15' or more, probably with a very curvy form to fit the layout room shape.  Near the end, 3-6 car lengths back will be an under track magnet.  I'm not real sure on the position yet, but that's my first guess.

Instead up a traditional hump, what will be at the control tower will be a ½" grade change going down.  Cars that have been uncoupled and "placed" in push mode will be pushed off the grade change left to roll into the yard on the track set by the Tower Operator.

The Tower Operator will have the switch list and will direct the pusher when to uncouple a certain car or cut of cars.

This design is more along the line of Gravity Yards, rather than true hump yards.  Here is a link to wikipedia article that has a blurb on Gravity Yards http://en.wikipedia.org/wiki/Classification_yard

I've identified 2 problems on my test track already....metal wheelsets will roll freely and crash into the car ahead on its track, or if the first car, it can roll past the end of the bowl.  A possible 1/8" grade change at the end fixes this, but there is a bit of rollback.  Not that big of a deal.

Plastic wheelsets that are really cheap may not roll at all or not far enough.  I have 2 solutions: 1.  Allow the Tower Operation to use the "magic stick" to push the car and 2. Have the bowl switcher come up and get it and bring it down into the bowl.  Obviously at the far end of the bowl there will need to be a switcher on hand to help tidy up the bowl.

One of the things I like about the design is that it takes 3 operators.  This meets one of my goals in that I want the layout to require lots of friends to come over and operate the thing.

Anyways this is something to chew on for a while - I'll be testing the concept in the near future and talk more about it then....

Thursday, July 24, 2014

Using Cricut Explore to make stencils for "patch" work


So I got kind of tired of making decals for everything, especially patch jobs on freight cars where I want different numbers on everything.  I was cleaning my supply closet and found some stencils I used to use in the Army on all kinds of gear.  This gave me an idea.....

Since I model a Belt Railway which has to get lots of stuff second hand, it occurred to me that a set of old Milwaukee Road 50' box cars that I had might make good "patch" jobs.  Rather than send the cars through the paint shop, I made some stencils using my Cricut Explore and just taped them onto the sides and sprayed some new reporting marks and numbers on each car.  It turned out pretty decent.

So here are some pix I made from the project:


Above is 3 Rail Box cars that I did this way and a screenshot of how it looks in the software...


And that's about all there is to it....

Monday, June 9, 2014

The Cricut Explore as a CNC machine for Model Railroads

The Cricut Explore as a CNC machine for Model Railroads


Shortly I'm going to give you a pretty good review of the Cricut Explore.  But first I wanted to give everybody the heads up that I'm experimenting with now and I have a couple first impressions.

1.  To use this machine you need to know how to make .svg graphics with alpha transparency.  There are lots of programs that do this nicely and I haven't really picked a favorite yet.

2.  The thinner the sheet of plastic you are using the more accurate cut you will get.  This opens up a whole realm of possibilities that haven't been practical in the past.  I'm especially interested in trying paper thin sheets to use as rounded sheet metal.

3.  The combination of parts to make an assembly is really exciting.  Recently I mentioned a project where I'm placing an MP15DC cab on an Athearn DD40 to make a huge switcher.  I'm going to add 2 details that I'll make with the Cricut - a Commander's Independent Thermal Viewer at the front of the locomotive just like the kind found on tanks and a massive illumination system like the kind found on fishing boats.  It might look crazy, but it will be fun.

The Cricut Explore opens a whole new world of kitbashing possibilities.  I know that many projects take far too long to complete solely because the fabrication of accurate parts is such a daunting task.

On my first try, I made a set of parts to restore the pilots on the front and rear of an FP40 that I've been working on.  It was simple.  Plus, the pattern is saved in my library and I can do it all over again whenever I need to.

Sunday, May 18, 2014

Fast Tracks Handlaid Switch Review


So I made my first switch using Fast Tracks

Here's the link: http://www.handlaidtrack.com/

I got the kit to make #6 Code 100 switches in HO Scale.

First thoughts:

1.  They messed up my initial order and it cost me an extra $45 to send back the wrong rail and receive the correct rail.

2.  The customer service takes some patience to contact, mainly because the guy you speak with is the guy who makes the stuff.

3.  That being said, he knows what he's talking about.  Leave a message and he will call you back.

4.  Print the diagram for the switch you are making.  I happened to have legal sized paper and printed mine on one page and it is absolutely a timesaver and really helps you understand what you are doing.

5.  Make your first switch in front of your computer using the videos that come with kit.  I watched all of them first and then watched each one as I completed each step.  Certain videos are out of order on purpose, mainly the ones demonstrating how to actually make the points.  Watch those very carefully.

6.  I used both my 30 watt iron and my 250 watt gun.  I found the iron sometimes not powerful enough to get the solder to flow.  The big gun is too powerful for much of the build and I actually melted a couple pc board ties with it.

Things I learned:

1.  Tinning the parts where ever you can makes things just a but easier and prevents globs of solder from forming.

2.  The Plio Bond glue is good stuff.  Make sure you shake it just like the video tells you and clean your tip everytime you use it.  Keep the box so you can stand the glue upright when not in use.  Be patient with glue, it is contact cement so give it the time to cure on both parts before connecting them.  I had some quicksticks come apart a couple time because I didn't let the glue set long enough.

3.  After I made my switch and installed it into my test track I learned right away that my points weren't sharp enough.  Just a touch from my moto-tool cutoff wheel corrected this problem.

4.  I did not make hinged point rails and have now found out that they are hard to switch positions.  I tried a ground throw, but a plastic ground throw doesn't do the trick.  I still have no intention of ever make hinged point rails at this time because the continuous ones look and perform so well.  The problem of throwing the switch is one that I can solve, just haven't gotten to that yet.

5.  The conditions I tested my first switch on are harsh.  It's carpet taped directly to carpet with no road bed.  That's my standard for testing reliability.  I post more about how and why I do this later, but for now I'll say it's mainly to test my equipment to make sure everything meets operating standards.  I also use the Life Like track with plastic road bed and standard flex track directly on carpet to incorporate a number of grade changes and soft track sections.  Anything that works on my test track works everywhere.  The switch is working better than an Atlas Snap switch that I had in there before.

6.  As poorly as I made my first switch, it's a big improvement over a ready to run snap switch.

7.  Making Fast Tracks is a good example of a skill with a learning curve.  I expect my next one to be a huge jump in quality.

8.  The form needs to be brushed thoroughly with the wire brush that comes with it.  I couldn't understand why the rails were so tough to get into the form until after I was done.  When finished I scrubbed and washed the form with a wire brush and soap to clean the acid paste flux out of it and noticed that there had been fine machining particles in the sharp places.  Rail fits much easier now.

9.  Having the rail fit well into the form will eliminate 75% of the problem I had with gaps between the rail and the PC Board ties.

10.  Fast Track swtiches are super forgiving on mistakes, which is awesome because I made so many.  I re-did a bunch of soldering outside the form with no problems.  I used my moto-tool to fine tune sharpness with no problems.

11.  Here's a tip on the point form tool:  take a thick shop rag and lay it across your bench vice and gently secure the point form tool in the vice before filing.  Then use both hands on the file to make the point.  It vastly improves the accuracy of the filing.  Also use a brass wire brush to clean the file, it does a much better job than the steel brush.

And that's my first review....in the next one I should have more useful info and I'll do some pix to go with it.

Final thought:

I invested about $450 into everything I got.  I got enough stuff to make 15 switches and all the one-time buy tools.  That seems like a lot of money, but 10 of those switches are being bought by a couple friends which helped me with the cost.  In my group of modelers, I'm the switch guy now and that should make this investment even up for me over another couple batches.

More to come about Fast Tracks.....my first review says Fast Tracks is some good stuff and it was fun.

Thursday, May 8, 2014

My workbench has 2 sides, one side is where I work and the other side is where my 4 year daughter sits and creates various things from her imagination.

There are some extra cabs of various types in a basket close to her side and there is an Athearn DD40 that I was going to replace the cab on it.  I was looking at it and asked her what she thought I should do.  She picked a cab out of the basket and said:

"Daddy this is where the people go on that train.  You need to put this one."

It was a cab and platform for an MP15DC.  I had already cut the existing cab and rear off the shell.

"Trust me Daddy, this is where the people go."

There are about 10 other more realistic choices in the basket and I started to make an excuse, and she said:

"Daddy. This is the right one."

Who can argue?

So all I could do was agree and start making it so the cab from an MP15DC could be mounted on a DD40.  She also pointed out that I would need to install a large wire screen mesh grill on what will now be the front end of an MP40DC....


that wasn't the end of her imagination for the day....

And so I received yet another set of instructions from my 4 year daughter who is a very creative mechanical engineer....

We have a hidden test track in my office that runs under some furniture which is high enough for her to crawl under.  She likes to stage freight cars in hidden places.  It was a little dark under there and she needed a flashlight to find something the other day.

I just so happen to have a super beat up spot light MOW car with a caboose cabin and large light on it. I got it in a batch from ebay and have it all in pieces and was working to restore it.

At the same time I was experimenting with a rectifier and a bunch of LED's that I was going to use for someting else.  She picked an extra large LED out of my bin and told me that that should be the spotlight on this MOW car.

The LED she chose is 28,500mcd and as big as one of those erasers that you put on top on a pencil.  I hooked it into my circuit and showed it to her; it's blinding bright.

She said: "Daddy we are going to need at least 2 of those in case there are any ghosts."

Fortunately I have another spotlight car and now both of those cars are about as bright as a surefire flashlight.


She did approve of the small on/off switch mounted on  the deck of each car.

Monday, April 21, 2014

So what's happening today on the workbench....

I have obtained a Bachmann E60CP which has an identical power truck like that one I posted earlier.  My intention is to place both of them in a Trainmaster Dummy unit that I have create the mighty H40-66.

Yes the H40-66 is the most powerful FM locomotive ever produced, albeit by a 3rd party.  It uses recycled dash 7 trucks and has 2 engines instead on just 1.

The E60CP is going to be recycled into a diesel engine that is very similar to the E60CF using a couple small can motors that I have.

As long as I'm at it, I'm going to repower an AHM SD40 with a couple small can motors and see how that goes.

So many projects.....

Sunday, April 13, 2014

What is on my workbench at 3pm April 13, 20014....


Right now is the M650, just about done - down to handrails and some touchups.
The SD45MA4, yes the beast is back with a vengeance....4500hp and a safety cab made by someone else
Then 4 F units, not sure what designation I'll give them all first, depends on what details I add.
Finally, the (tentative) F60 with 3800hp.....

I model the future and due to the political situation this is what happens with locomotives in combination with industrial sized metal printers and copyright laws - use it or lose it....

Thursday, April 10, 2014

What's on the workbench today....


First up I have 2 blue box DD40's that came to me in rough shape.  What I do with all my DD40's is change the cab and add a scale width nose.  Then I close the gap between the two engines and make 1 monster.  The green and yellow is going to be a patched unit with red cab and nose to match the colors of my MCBR railroad.  My road is cheap so the decision has been made not to repaint the body, but just patch it and upgrade some components.  The black unit is getting an "M" cab and is going to become the fearsome DD50.

Next I have an FP40 with I am transforming into an F55, I'm not sure what that will look like yet, but it will be angry looking.

Then I have another SD45 that I'm making into an SD45MA4.  Safety and some other features to make it tough looking.  I already removed the dynamic brakes and will add something more fearsome instead.

As I've said before I model the future so anything goes.  In my future a lot of old locomotives that are sitting in deadlines and rebuilder's yards are refurbished using much more advanced electrical for a lot less money.  So anything goes.

There are also 5 F units that are all being painted plain red and getting some up grades.  The one F7 already has a new wiring harness in it with 2 super bright yellow head lamps and they look cool....

I still haven't finished the M450 and M650, they just need handrails so that should be done pretty soon...

Monday, April 7, 2014

How to make replacement motor brushes from scratch


I lost a couple motor brushes during a maintenance session and became very frustrated.  But, I was smart enough to google scratchbuilding motor brushes and turned up pretty much nothing.....

Except that a guy talked about his dad making brushed from the core of a dry cell battery.  So I tried that first with a AA cell. I used the graphite around the core, but it didn't quite work.  I may revisit that one again one of these days because I don't think the spring I used was strong enough.

That gave me a new idea...while shopping at Lowe's I picked up a couple contractor pencils, not flat ones, but large round ones.  So I said what the hell and cut a chunk off and filed it a bit and put it in.

It worked, actually pretty good too.  I might make a video about this...next up is to test it under load for several hours and see how durable it is....

Friday, April 4, 2014

The Heljan B807 Brewery and the Grusom Casket Video


That's the video, since I made that building, I added another B807 to make it twice as big!

Thursday, April 3, 2014

The DD40 Project

Here it is disassembled and I'm getting ready to overhaul all the mechanical parts...

 Now here it is after the mechanical over haul and the broken parts of the body have been removed...
I have scale width cab I'm going to add and then scratch build the nose....I'm not repainting the whole thing, instead I will just patch it.

 here's a quick look at my RS50 project...it's coming along nicely..

Here is a Tyco GP20 from before the Power Torque system....these motors are 6 pole (I counted 3 times to be sure) they are also difficult to repair require some very advanced skills.
As bad as it looks, it still ran on the test track.
The main problem is all the rivets used to hold it together, so I started by grinding off the rivets.
Then I went through every possible contact and polished it.  I also looked for the key to how a motor like this could accommodate DCC and yes I found the crucial connection.


It looks bad, but after cleaning and polishing everything and putting on new traction tires I was ready to reassemble it.  I made a couple rivets and replaced all the rest with #4 screws.

And sure enough this thing runs exceptionally smooth, now if I only new what I was going to do with it...

Monday, March 31, 2014

Thursday, March 27, 2014

The Super 630 Power Torque Golden Eagle

The deed is done.....my Golden Eagle is ready roll.
First up is the wiring I did for this unit.  Super bright LED's fore and aft and 2 purple neon LED's for ground effects.  I used a rectifier and a 1k resistor.  I wish I had added a capacitor, but down the road a bit and I will:


and here it is.....


Gold Snowplows on the front and back, brass handrails and gold trucks.  And it runs very smooth...

Wednesday, March 26, 2014

The Tyco Golden Eagle C630

Here it is before I started working on it:

How to repair and restore Tyco Power Torque Trucks

1. Completely and carefully disassemble everything without losing anything
2.  Carefully wash the shell and sideframes with dish soap


3.  Using the wire brush on the lowest speed of your moto-tool polish every place a moving part goes
4.  Polish the axle wells and sides where the trucks contact the frame


5.  Polish the surface of the motor where the brushes make contact


6.  Double check the axle wells and polish again


7.  Polish every wheel and axle
8.  Use the plastic brush and some Brasso or Simichrome and polish the wheels and axles again
 

9.  Polish every metal piece you can find
10.  Replace the traction tires with new ones
11.  Carefully reassemble and add some grease to the gears

Now you can test everything to make sure it works and goes in the right direction
The Tyco C630 can be easily converted to DCC, I might get around to posting a link to the guide on how to do this later.

The power torque motor is one of my favorite motors to restore because it live up to its name.  This motor can pull.  Of the locomotives setup this way, the Power Torque is probably the best and most reliable.  Bachmann and Life-Like pancake motors are kind of like this and they have some power.  Also the Pemco SD35 is a lot like this and it has some torque.  But overall, the Tyco Power Torque is the smoothest running and most powerful.

The other thing I like about Power Torque motors is that I can repair even the most serious damage.  Power Torque's never die.  The last one I did was on an SD24 that had the pins for the gears broken off.  I was able to very easily fix that by drilling a hole and inserted a small nail and then cutting it off at the proper length.


As you can see, I painted the sideframes gold and a gold snow plow.  I'll also be adding brass handrails that look like gold.  Then I plan to add a rectifier and some super bright LED lights.

Tuesday, March 25, 2014

The Field Expedient Flywheel

So I had an idea about adding flywheels to an AHM GP18.  It occurred to me that it might be possible to take washers of precisely the correct measurements and mount them as flywheels.  So that's what I did, I measured, went to Lowe's and measured washers....what I found out was that quarter inch flat washers had exactly the correct measurements.  With a little masking tape and mounting the motor just bit higher I got this:


and it works with no problem....no a huge boost in performance, but a smoother operation.

The Golden Eagle

I found a 1980 Tyco Golden Eagle C630 on ebay for almost nothing....check this out:

I love the power torque trucks, these locomotives can really pull, which is what I like.  All of my rolling stock is quite a bit over the weight standard so I need the fleet to have about 30-40% of the locomotives equipped with either traction tires or blue box athearn.  What I can do with this C630 is pair it with a slightly modified C628 where all wheels pickup power.  This makes for a very reliable consist.  The C628 slips due to its super smooth wheelsets and it only has 4 powered axles.  By getting power from the additional 2 axles a C628 generally won't stall which will keep the C630 from stalling and that's how I get nice match-up of motive power.....more about my consists and torque tester later.

My plan for this Golden Eagle is to add shiny brass handrails, change the trucks to black, add maybe a blinking led on top with an on/off switch, kadee's and just a bit of weathering.  I know that is all sacrilege for a Golden Eagle, but I intend on using it a lot, so I need to pimp it out...I also have a plan to add neon ground effects which will be totally bad ass....

Next I got another DD40....it's in bad shape, doesn't run, broken all over, but it's a blue box....

I can't resist a cheap DD40.  I already had 3 of these, but as long as they are as cheap as this one was, I can never have too many....there is no such thing as a blue box Athearn that can't be fixed and restored...

I did my first set of brass handrails.  They aren't perfect by any means, or prototype or even straight.  However, now that I know how, my technique will start getting better.  I have made tons of piano wire handrails that turned out awesome, but brass is new to me.  I like it and I'm going to do more of it.

So I got rants and all kinds of other cool stuff for a little later....

Monday, March 24, 2014

So I finished up my high nose GP38-2 and weathered it with my airbrush.  I will admit I like the way weathering turns out with the airbrush.  I have been handpainting everything since I did my first car and first locomotive.  But I've painted 2 locomotives with the airbrush now and I'm starting to like it.  The only thing I don't like is how much paint the thing uses.

My M450 and M650 are down to just handrails now.  I'm trying to learn the brass handrail making business and so far I'm liking that too....I got much more to say a little later, especially about the Golden Eagle and DD40 I just scored on ebay...

Tuesday, March 18, 2014

Scratchbuilding HO Scale Hand Rails using brass wire

There it is....so as most of you know it's really tough these days to make your own handrails because Athearn no longer sells stanchions.  Gone are the days when you could bend some piano wire and attach some stanchions and you were good to go....

I've tried a lot of stuff to make handrails.  I've done a lot of using the nearest next best locomotive handrails and making them fit.  It's not pretty.

I finally stumbled across this:

http://www.cnwhs.org/articles/1121826596.pdf

That is the way I'm proceeding in my M650 project.  I started with some brass wire and found that this technique is much easier than I expected.  If it turns out to be as good as it looks so far, I'll be posting a video about how I did it....

For those of you searching for a solution, this is probably going to be the one.....

Friday, March 14, 2014

What's on the workbench right now.....

Well I decided to take this project that was started from an AHM C628 and a safety cab and turn it into something bizarre.  It's going to be my M650 project....

So here is where it's at along side a GP38-2 that is getting close to complete...
That's the state it's in right now.  It has 1 minor operating problem right now in that it derails going forward through a #4 switch.  I know the cause and will fix it tomorrow....here's how it evolved... this is the finished wiring after the total rebuild...NOTE that I don't have DCC, I'm still deciding on that one, but this setup is prepared to accept DCC with plenty of room to spare.

Here's how the wiring basic part was done:


Here's the motor and 1 truck


Here's a truck - I extended the wipers so the third axle draws power


Now as you can see I like stiff wire.  Yes it is tricky to get it to move freely and not bind up stuff, but the solid core wire is worth it in that I only need to move the power up to 15 on my Tech II bench power supply instead of the 25 that it normally takes for these AHM motors.

Why do I mess around with stuff like this and pancake motors and old Tyco motors?  Because I like it and I can do whatever I want with worrying about wrecking some part of a $250 locomotive.  I like fabrication and scratchbuilding, rather than investing lots of money into something that's too expensive to touch.

I have over 150 locomotives, mostly Athearn Blue Box from the 80's and early 90's.  I also have lots of AHM, Bachmann and Life-Like that have been heavily bashed.  But the thing is - at any given time I only have around 10 locomotives that are down for maintenance and around 5 in my salvage bin.

Slowly but surely I'm getting all of them ready for DCC... but what system to get still baffles me...here are my requirements:

1.  MUST be wireless network, and I don't mean radio or infrared.  I mean standard 100mb wireless.
2.  I will be using smartphone apps as throttles.
3.  I will be managing my system with a dedicated computer network - I've got plenty of extra computers
4.  must support 100+ locomotives, not run them all at once, but they will be parked on a siding somewhere
5.  must do very well with consists
6.  locomotive number will be used as the address
7.  must be a system that has built in future upgrading - I'm not buying old technology or stagnant tech

so far that's what I'm looking for....